|
-
SpyderLovers Founder

-
 Re: No Magic Neon HID install Re: No Magic Neon HID install
I've installed HID bulbs on my motorcycle and agree that they make a tremendous difference....
I'm looking to purchase a Spyder and was shocked at the price of the HID option, so I'm glad to see this post.
How are you handling high beams?
Was the stock bulb dual filament?
or are those bi-projectors that flip the shield up when you hit the high beam switch?
-
Re: No Magic Neon HID install
The stock Spyder headlight bucket already has a built in shutter system for the high beam, as all H7 type bulbs are single filament be them HID or halogen.
This kit is now for sale up on our site @ www.nomagicneon.com. The complete kit will retail for $349.95 with Spyderlovers club members getting a 10% discount off of that price.
We hope that at this price this important safety item will now be within the reach of many more people. Finally allowing the safety and performance these kits provide to be obtained without breaking the bank.
MM

-
Re: No Magic Neon HID install
Hey MM will this Hid will fit on the Fog lights as well?
-
Re: No Magic Neon HID install
Thanks for the step by step Lamont. As always, I love it when you post your photo enhanced how to's.
-
Re: No Magic Neon HID install
Lamonster,
Great job & post. I guess I'll be speaking with Evan & Patti again.
-
Re: No Magic Neon HID install
my advice is to go with 4500 or 5000 Kelvin anything higher is not cool and attracts negative attention..
Who knows more about the fog lights?
What kind of bulbs are in there?
Thanks to this thread, I will not order the OEM Hid lights as I'm very happy to hear that those are Bi-Projectors.
-
Re: No Magic Neon HID install
Our reaserch has shown that the factory HID lights from BMW, Mercedes Benz, Audi and most European high line cars use ether the 6000K or 8000K units. That is what gives that distinctive crystal white light you see coming down the road at you. We have found that is the effect that most people want to see when spending the money to upgrade to HIDs. We have K ranges above and below the 6K and 8K available as well.
-
Re: No Magic Neon HID install
4300K and 5000K kits are available as well as 10000K, 12000K and 15000K.
-
Very Helpful Member

Re: No Magic Neon HID install
Now for the legal question Magic Man. Do you know if certain K values of headlights are illegal in certain states? Just wondering as many states have laws against certain light or lens colors in some light positions like tail lights or turn signals. Not that I want them but I wonder if someone buying 15000K HIDs runs the risk of getting hassled by the police more than someone who gets 8000K HIDs.
Former Happy Spyder Owner
Just decided it was time to move onto other things.
-
Re: No Magic Neon HID install
There are no States that I now of that have anything on the books regarding actual K ratings on headlights. However, there are 50 of them and I might have missed something? There are a few States that have minimum requirements for candlepower output, but HIDs these blow those away.
There are 3 States that are to be commended regarding lighting and motorcycle safety. Pennsylvania, Maryland and Delaware all have just passed laws that allow motorcycles to have ANY COLOR ACCENT LIGHTING ON A MOTORCYCLE, as long as it is not strobing or flashing. This is to help increase the visibility of the motorcycle to other motorists. These 3 States are leading the way in motorcycle safety as they have all done something to try to keep us safe BEFORE we get hit, rather than the other States that say we have to wear a helmet to try to keep us alive AFTER we get run over. Because research has shown the #1 response from drivers who hit a motorcycle is.... The infamous "I didn't see him."
As for the light color. Personally I feel anything 10K or over is getting too blue for my taste, and is beginning to shift outside of the best wavelength for your eye to see. However, we have sport bike kids who all buy 12 and 15K all day long and I don't hear of any getting stopped? Go figure?
-
Very Helpful Member
Re: No Magic Neon HID install
A few of my takes on the NoMagicNeon HID kit install. I agree with everything that Lamonster has here but I'll add my thoughts in certain spots.
 Originally Posted by Lamonster
Now insert large female connector from HID bulb through locking plate hole. The first one I filed a bit to get it to go but on the second one I was able to push it through. It's a very tight fit but it will go if you try. Now pass smaller male connector through hole in locking plate.

I did not have to file the female connector for either light to get them through the holder. It was a real bugger but the female connectors for both left and right HID fit through. They are semi-flexible and with some pressure on the edge of the connector while pushing it through the locking plate, they go.
Originally Posted by Lamonster
If you look at this pic you can see why we had to break and bend those two little tabs out of the way. You want the bulb to sit nice and flush with the keeper.

You need to make sure that the cutout on the base of the HID bulb fits very close to the tab on the holder that was designed to go up against the cutout. I struggled with getting the bulb to fit into the light housing and have the locking tabs turn in and lock down fully. Upon inspection, I noticed that that bulb wasn't fitting in the center of the holder and because of the way it is all supposed to fit together, the bulb not being centered would not allow both locking tabs to fit under the latches. I solved this by bending one of the parts on the steel holder that held it to BRPs plastic light connector. Once the bulb was centered in the steel holder, I could twist and lock the holder into the housing without bending those tabs that lock the holder into the housing.
Originally Posted by Lamonster
Now here comes the tuff part. :  You need to install the bulb back in the holder. There are two tabs that lock into bolt heads. That's why they twist out so now you're going to twist them back in. This bulb has a little bit thicker plate so you need to bend them just a bit to get them to tuck under the bolt heads. It was a pain and with my big hands I decided to just take the top of the dash off so I could see what I was doing and so I could take a good picture of what you need to lock into. Just make sure they are locked in good.

Do yourself a favor and just remove the top of the dash from the start. It is only a ten minute job to take it off but it makes working on the lights so much easier. Remove the windshield (4 screws), remove the side view mirrors (2 screws each side, 1 of them under a plastic cover and unplug turn signal wires), remove the tank plastic piece (2 screws and 2 plastic push locks) and 5 locking tabs on the top dash (similar to the digital display, 2 on each side and 1 front center). It opens everything up so nicely, your hands actually fit in the housings and you can see what you are doing. It opens up some more area to mount the ballasts and route the wires also.
Here is a picture showing how the female HID lamp connector doesn't quite make it through the opening of the steel holder. It fits by squeezing the plastic a bit.
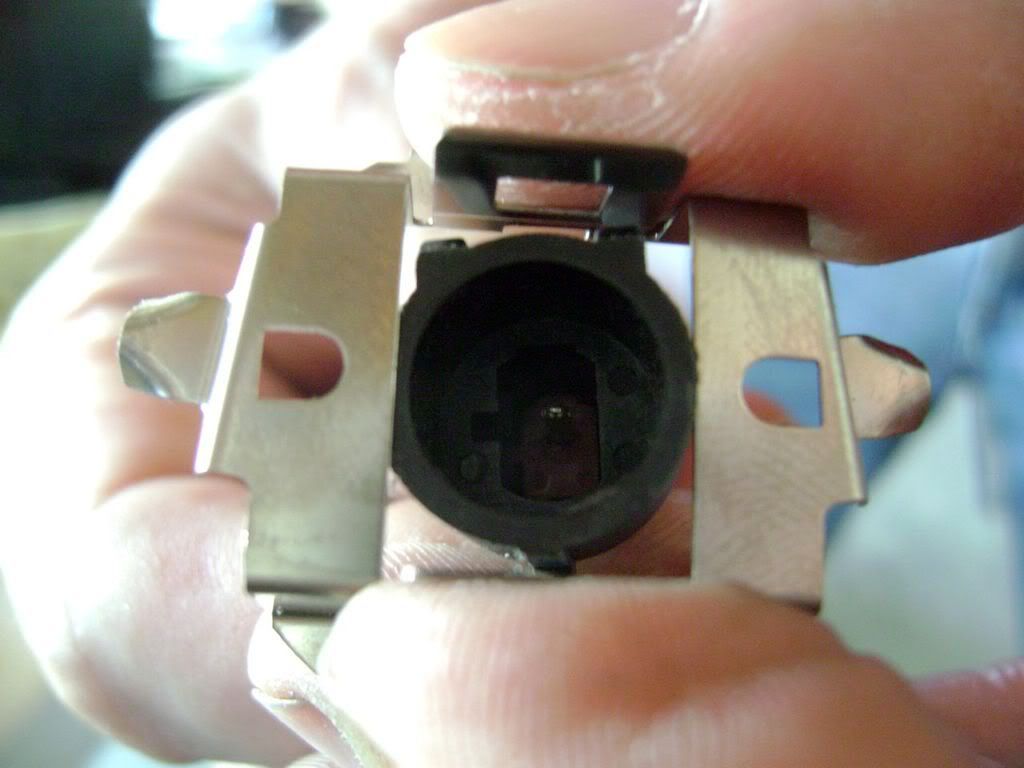
This picture shows the two tabs that are cut off or bent out of the way (red arrows)
The tab on the holder that the cutout on the HID bulb base is supposed to fit up to (blue arrow)
The portion of the holder that I bent a little to get the bulb to center in the holder (purple circle)

This picture shows how open the light work area is once you remove the top of the dash and where I mounted my ballasts toward the front of the dash area, on the brace between the headlights.

Former Happy Spyder Owner
Just decided it was time to move onto other things.
-
Re: No Magic Neon HID install
Hey bjt and Lamonster thanks for taking time to help post additional pics of the install!
It is always good to have more information to help people with the installs. Sometimes people can see things I miss myself when trying to write the install instructions, because I can't see the forest because all the trees are in the way LOL!
I hope these HIDs make riding your Spyders safer and more fun.
Thanks for the extra time you took to help myself and others with the install info.
MM
-
Very Helpful Member
Re: No Magic Neon HID install
Originally Posted by Magic Man
Hey bjt and Lamonster thanks for taking time to help post additional pics of the install!
It is always good to have more information to help people with the installs. Sometimes people can see things I miss myself when trying to write the install instructions, because I can't see the forest because all the trees are in the way LOL!
I hope these HIDs make riding your Spyders safer and more fun.
Thanks for the extra time you took to help myself and others with the install info.
MM
You're Welcome Magic Man. Honestly, the difference these lights make for nighttime riding is HUGE! I feel safer not only for the fact that other drivers can see me or notice me better but that I can see them and all other road hazards much sooner and more clearly. Thanks for researching and putting together this great product for us.
Last edited by bjt; 10-14-2008 at 09:36 PM.
Former Happy Spyder Owner
Just decided it was time to move onto other things.
-
Lamonster and Brian, Great write up. Thanks, can't wait to light up mine.
-

If only I brought my laptop out to the garage yesterday
man did I screw up the bulb retaining clips.
2 new clips on the way Home run stuff all instaled and tested no setbacks there
update HDX bailed my --- out this am
Last edited by Roaddog2; 04-11-2009 at 05:04 PM.
-
Half way thru the install. I am calling it quits till tomorrow morning. Thanks again for the good instructions. One question though. Does the blue stripe on the new bulb go on the top or bottom once they are installed, or does it matter?
Finished it up and rolled the Spyder outside. Man are these things bright
Last edited by dave01; 07-05-2009 at 10:57 PM.
-
Question on HID Lights/ BRP Backrest
What size fuse do you use for the NMN fog light install. And I took apart the BRP Back rest and painted it ,Went to put back together and forgot were the c- clips on the backrest adjustment were in the front or rear. thanks
-
Doru the Destroyer-Spyder Photo Investigator
-
Boy I thank you guys for the pictures and all the help with this install. 
-
Originally Posted by dave01

Half way thru the install. I am calling it quits till tomorrow morning. Thanks again for the good instructions. One question though. Does the blue stripe on the new bulb go on the top or bottom once they are installed, or does it matter?
Finished it up and rolled the Spyder outside. Man are these things bright
What about this Blue Stripe; top or bottom- don't matter???? Anybody know?
-
Very Helpful Member
Last edited by bjt; 07-16-2009 at 03:45 PM.
Former Happy Spyder Owner
Just decided it was time to move onto other things.
-
-
Just out of curiosity. Do you have a radio and if so did they interfere with it? Have read a couple of places where folks have installed the HID and it messed up their radio reception.
-
ESI HID fog light install
I read over this post for hints. My question is this: When installing the HID fog lights, do I need to reuse the clip like Lamont did in the headlight install? It looks like the bulbs already have the proper black plastic clip built in and it seems to fit but not turn. I dont want to force or break anything. Am I just not pushing hard enough?
 Posting Permissions
- You may not post new threads
- You may not post replies
- You may not post attachments
- You may not edit your posts
-
Forum Rules
|


Now that I have my No Magic Neon HID kit in I can see why they are so much better than stock. These things are really bright and it makes the stock lights look like they are running on 6 volts instead of 12. The price is much better too and now I'm thinking it's a worth wild mod for safety if nothing else. People are going to see you going down the road night or daytime.


 Reply With Quote
 Whatever the orientation of the bulb holder is when you start taking the stock bulbs out, be sure to put it back in the same way.


 the headlights worked
 k...
k... 
 then i took a deep breath and was like

