|
-
MOgang Member & Pyro-Man

 Installing 12v ACC Outlet Installing 12v ACC Outlet
I have had a few folks ask me about where and how to install a 12v power outlet or cig lighter to power their Garmin or other GPS, iPhone etc. This came from my post, 'How To Mount any Gizmo/ iPhone/ Garmin'
www.spyderlovers.com/forums/showthread.php?40427-How-To-Mount-any-Gizmo-iPhone-Garmin
There are dozens of ways to install a power outlet. You can strap one on to the handle bars or mount one with a RAM BALL mount, but I like a clean install and this was how I did it.
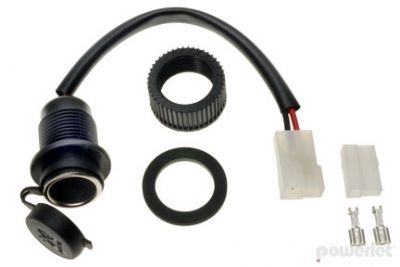
I used these two items and they aren't cheap, but they are the type of quality that you would want on your Spyder. The power outlet came from www.powerlet.com and the secondary fuse block came from Reggy at www.tricled.com
Powerlet has a long proven reputation with motorcycle accessories. Reggy and TricLED has a reputation that's 2nd to none in the Spyder community. The URL's below are linked to the two items that I used.
Powerlet's 12v capped outlet: http://www.powerlet.com/product/pane...rette-socket/6
Reggy's TricLED FZ-1 Fuze Block: http://www.tricled.com/TricLed.com/New_Items.html (scroll down to the Fuze Block item)
Although, the Fuze Block is not necessary to do this, you'll probably eventually need it if you plan on modding out your bike, so you might as well do it while you have all of the panels off, because you'll have to do that in the future anyway. It makes any additional lighting or other mods a piece of cake to install at a later date.
This is the complete outlet kit from Powerlet -
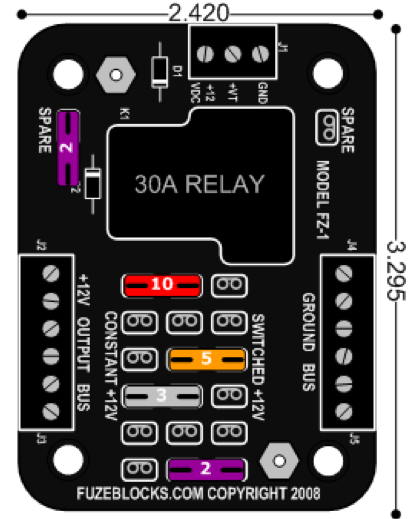
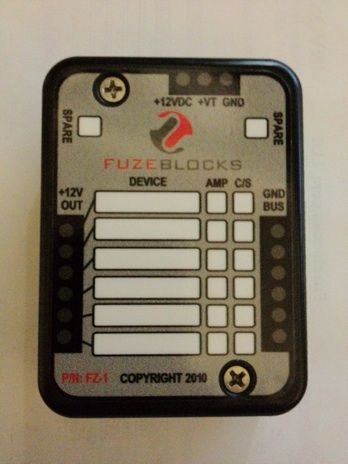
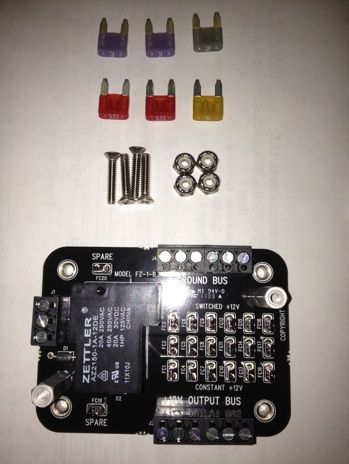
This is the full pic set of Reggy's/TricLED's FZ-1 Fuze Block -
Lets get started! You'll have to remove the right speaker grill, mirrors, upper panels, lower panels, the front panel around the headlights, both service panels (the black ones under the frunk lid) and the interior panel on the right side that gives you access to the manifold (only two screws). Fortunately, all of the other screws are the same size, so keep them in a Tupperware container or something similar. The two screws that hold the interior panel are much longer, so keep those separate.
A few of these pics are a little fuzzy. I had bad lighting and used my iPhone to take the shots, but they are clear enough to understand.
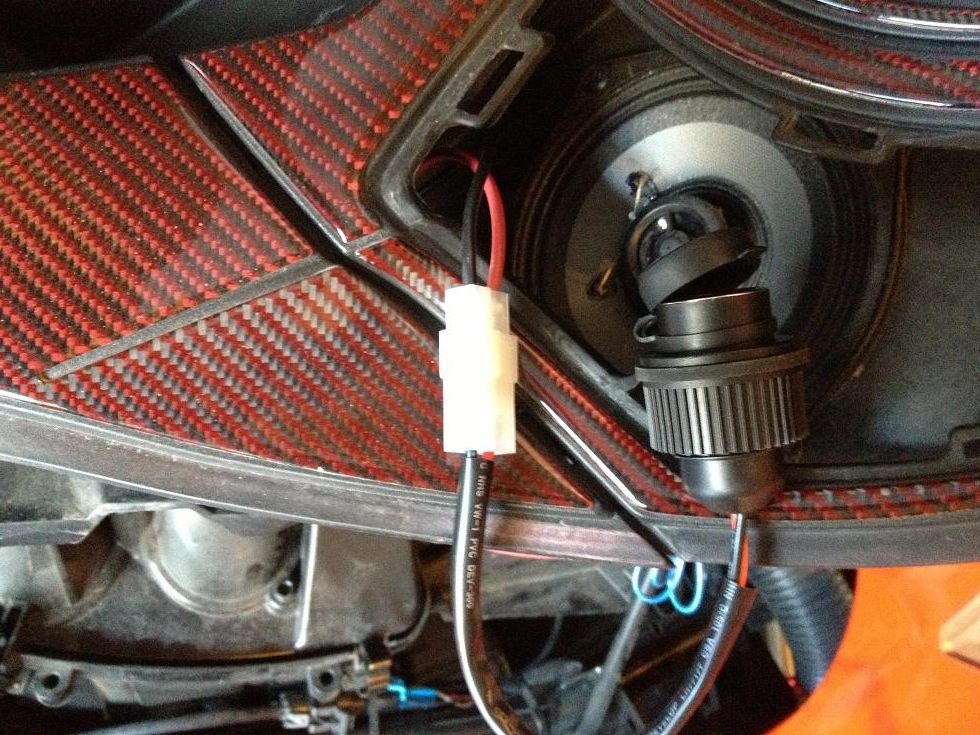
Once you pop off the speaker grill, you'll find that there's a lot of room behind it.
Strip off the ends of your + and - lead wires and route them through, under and around the headlights and front frame work. Ending at the fuse block.

Next, crimp the supplied plug onto the + and - leads coming back from the fuse block or if you opt, a 12G wire with a 10A inline fuse along with the same gauge ground wire. Using the FZ-1, I wired mine into the switched on +12v so that it was only active when the key was turned on. Once you've determined that you did all of the wiring correctly, it's time to put a hole in the speaker grill. This particular model calls for a 1 1/8" hole. I used a corresponding hole saw to do the job. Take care where you put this hole. If you are too close to the tabs it won't click back in. Look at the front and back of the grill very closely to make sure that you don't get it too close to one of the attaching female tab locations. I got it by a mm and I got lucky. I should have paid more attention to the hole location by looking at the back of the grill.
Next, test that it works before you start to button everything back up.
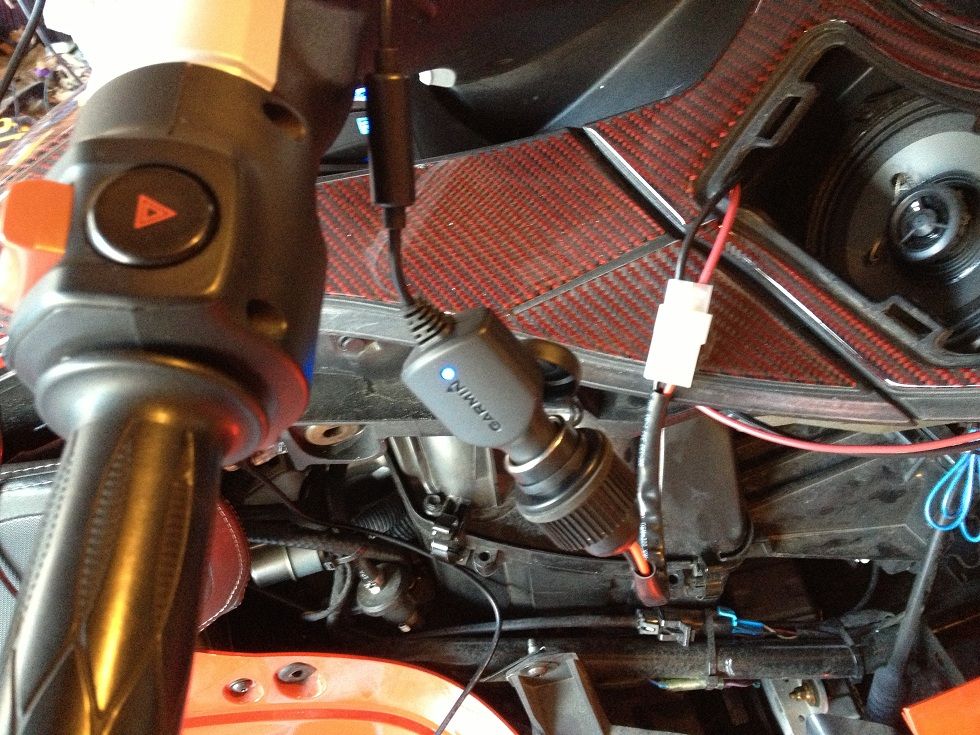
Cool, we have a blue light that shows that it's charging the Garmin.
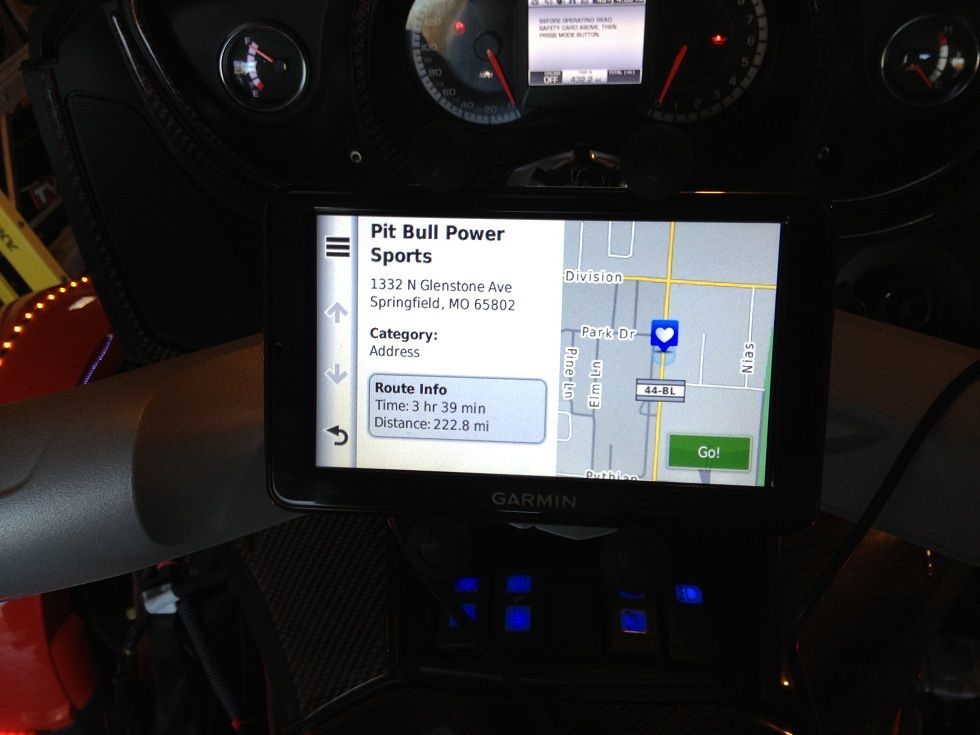
With the Garmin plugged in, we're good! Notice the shameless plug that I put in for Len's new shop? LOL!
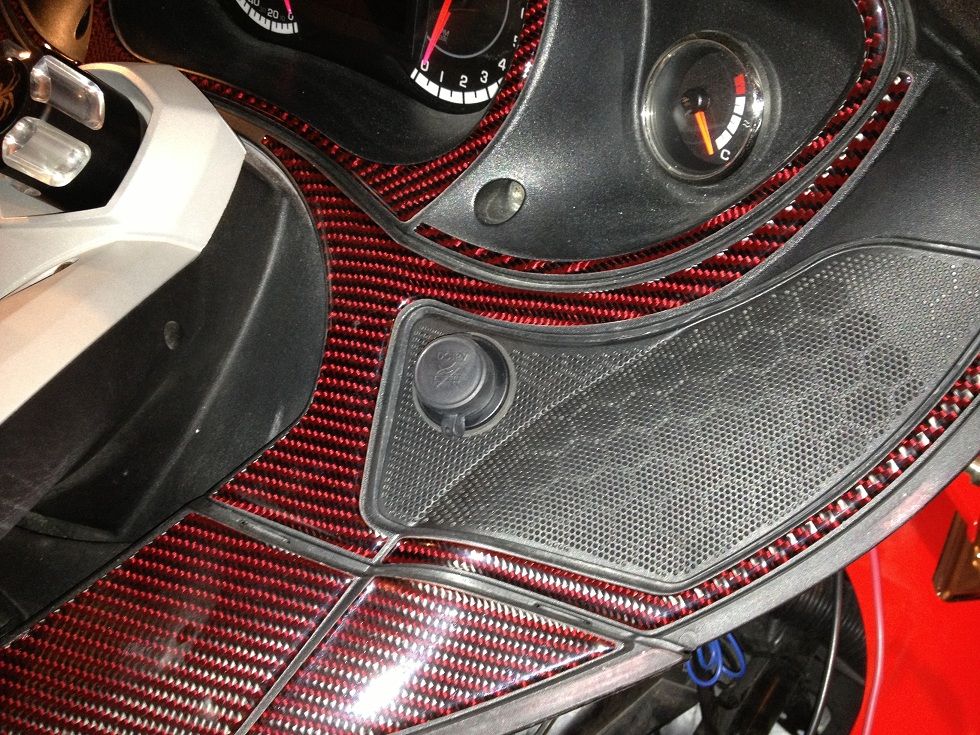
Having done all of that, this is the finished product. A nice and clean install that looks factory. It took me about 6 hours to do all of this, but it also included my taking the Green Filter out and cleaning and reinstalling it.
If you have any questions, please msg me and I'll do my best to help you.
See you at SpyderFest this year!
Kevin
Last edited by kevorama; 02-08-2013 at 11:37 PM.
Reason: Wrong URL
Dream as if you'll live forever, live as if you'll die tomorrow.
―James Dean
-
Very Active Member

Just another nice looking mod by Kevin!
-
Motorbike Professor

Thanks, Kevin. I wanted to make a how-to when I did my last ones, but my pictures weren't a tenth as good as yours. A how-to is only as good as the pictures. Nice job!
-Scotty
2011 Spyder RTS-SM5 (mine)
2000 BMW R1100RTP, motorized tricycle & 23 vintage bikes
2011 RT-622 trailer, Aspen Sentry popup camper, custom motorcycle trailer to pull behind the Spyder

Mutant Trikes Forever!
-
Registered Users

Very well done tutorial! Not trying to hi-jack your thread, but if someone wants to put one on an RSS, this is where I put mine:
AC plug.jpg
I used the BRP acc. plug ($29.99) and wired into the "optional fog light" fuse, since I don't have fog lights. Power stays on with the key off.
-
magical member

Great how too, I would love to see a detailed how too of wiring up the fz1 fu box that Reggy sells
harry
"Draco dormiens nunquam titillandus"
My Rides;
Nimbus 2000, Ford Anglia, 2012 Spyder RT Limited, Pre 14 Vintage Classic Collectors Edition!
Favorite Ride;
Nimbus 2000 boy this thing can fly.
Mods:
Charm of invisibility, Reparo Charm (cuts down on service cost)
One always wonders about roads not taken.

-
Active Member

Thanks Kevin, this was instructive. I was seriously considering putting a plug in the dash where the fuel gauge is but it appears that most people think that there is not enough room there. However I thought I saw one installed that way. Do you have a perspective on that? What you did looks really nice, will the speaker cover hold up with the pressure of plugging in and pulling the plugs out?
Name: Eric Heims
Red 2016 RTS, Diamond R Armrests, Ram X Mount, Doc Humphreys Dampener, BajaRon Swaybar, Spyderpops "Critter Splitter"
 "It is the common fate of the indolent to see their rights become a prey to the active. The condition upon which God hath given liberty to man is eternal vigilance; which condition if he break, servitude is at once the consequence of his crime and the punishment of his guilt." John Philpot Curran 1790
-
Motorbike Professor
 Originally Posted by Farmbanker

Thanks Kevin, this was instructive. I was seriously considering putting a plug in the dash where the fuel gauge is but it appears that most people think that there is not enough room there. However I thought I saw one installed that way. Do you have a perspective on that? What you did looks really nice, will the speaker cover hold up with the pressure of plugging in and pulling the plugs out?
The speaker cover generally stays in place, although I have had mine pop out occasionally when unplugging from the snugger Powerlets. Holding the speaker cover down with a finger will cure it...or put a blob or two od TRV silicone on the opening before reinstalling the grill, if it makes you more comfortable. I doubt the cover would ever pop loose at the corner when removing a cigarette-type plug. The cover willjust release a prong or two...not all 6-8 of them. It isn't going anywhere.
-Scotty
2011 Spyder RTS-SM5 (mine)
2000 BMW R1100RTP, motorized tricycle & 23 vintage bikes
2011 RT-622 trailer, Aspen Sentry popup camper, custom motorcycle trailer to pull behind the Spyder
Mutant Trikes Forever!
-
Active Member
Originally Posted by NancysToy
The speaker cover generally stays in place, although I have had mine pop out occasionally when unplugging from the snugger Powerlets. Holding the speaker cover down with a finger will cure it...or put a blob or two od TRV silicone on the opening before reinstalling the grill, if it makes you more comfortable. I doubt the cover would ever pop loose at the corner when removing a cigarette-type plug. The cover willjust release a prong or two...not all 6-8 of them. It isn't going anywhere.
Thanks Scotty. I assume given your extensive experience that your vote would be for this location, that you are very satisfied with it? Just double checking because in about a week I am going to install a new voltmeter, relay and fuse box, the power outlet, some lights, etc and once I start making holes I don't want to look back and see that I made a mistake. This install looks nice and clean so I really am leaning towards duplicating what Kevin did here. This install looks nice and clean so I really am leaning towards duplicating what Kevin did here.
Name: Eric Heims
Red 2016 RTS, Diamond R Armrests, Ram X Mount, Doc Humphreys Dampener, BajaRon Swaybar, Spyderpops "Critter Splitter"
"It is the common fate of the indolent to see their rights become a prey to the active. The condition upon which God hath given liberty to man is eternal vigilance; which condition if he break, servitude is at once the consequence of his crime and the punishment of his guilt." John Philpot Curran 1790
-
Motorbike Professor
Originally Posted by Farmbanker
Thanks Scotty. I assume given your extensive experience that your vote would be for this location, that you are very satisfied with it? Just double checking because in about a week I am going to install a new voltmeter, relay and fuse box, the power outlet, some lights, etc and once I start making holes I don't want to look back and see that I made a mistake. This install looks nice and clean so I really am leaning towards duplicating what Kevin did here.
I like that location. Easy to reach with the wires, lots of clearance, and convenient to use. I had my outlets in the dash on my 2010, and I would never do that again. If you are still uneasy, the speaker grills are cheap if you change your mind later. Put some masking tape on the grill before you drill, mark it, then center punch it to keep the drill from wandering. I installed mine 1" down and 1" out from center, on the flat part of the grill. I'd recommend removing the grills before drilling. Clean-up is easier that way, and there is no chance of drilling through the speaker...just don't lay the grill on the glovebox to drill it. 
-Scotty
2011 Spyder RTS-SM5 (mine)
2000 BMW R1100RTP, motorized tricycle & 23 vintage bikes
2011 RT-622 trailer, Aspen Sentry popup camper, custom motorcycle trailer to pull behind the Spyder
Mutant Trikes Forever!
-
Very Active Member

Great write up. Has anyone done a how-to on installing the FZ-1 fuse block? I have one on my bike (m109) and I an very interested in where everyone is putting the fuze block and getting the main power and ground locations to the fuse panel. Before I attempt this on the wifes RT-S.
2007 M109R LE - To many MODS to list. Its cheaper that way!!!
-
Very Active Member

Power outlet..!!
Great presentation and excellent work. But on my RS 2012 they have the connection including the rubber boot zip tied under the fuse box. All I did was drill for the outlet in the frunk plug it in put in the fuse and run the cable to the bars.
Gene and Ilana De Laney
Mt. Helix, California
 2012 RS sm5
2012 RS sm5 , 998cc V-Twin 106hp DIY brake and park brake Classic Black
-
MOgang Member & Pyro-Man
Originally Posted by M109Dreamer
Great write up. Has anyone done a how-to on installing the FZ-1 fuse block? I have one on my bike (m109) and I an very interested in where everyone is putting the fuze block and getting the main power and ground locations to the fuse panel. Before I attempt this on the wifes RT-S.
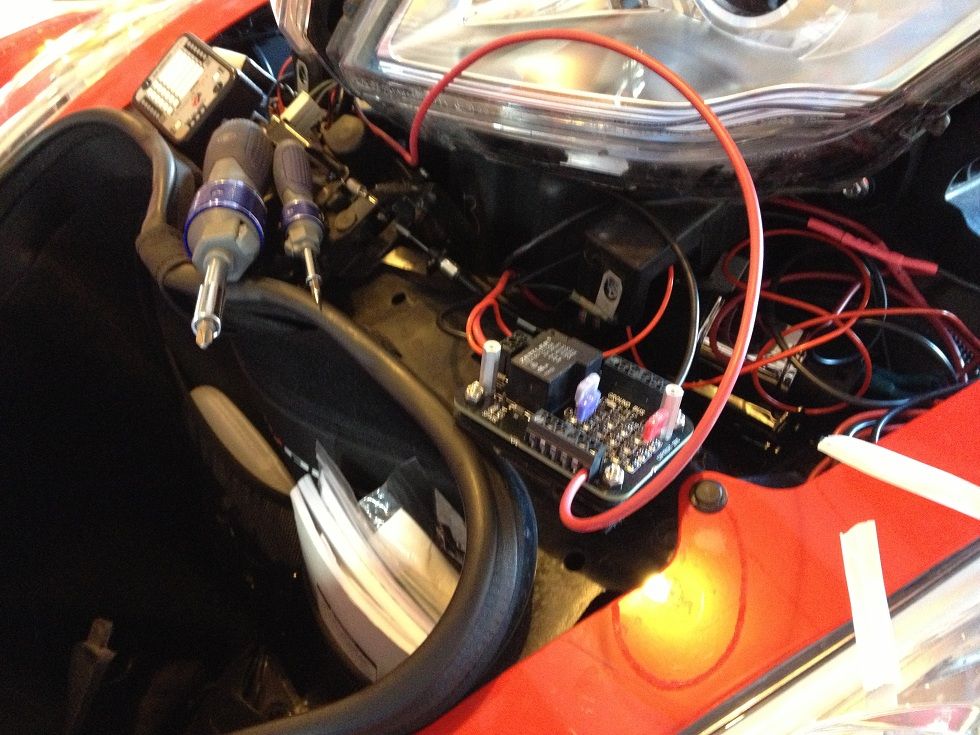
I placed my FZ-1 under the service panel opposite of the reservoir. The right side, looking at it from the front. I used velcro tape to hold it in place and there's plenty of room. I have a Steibel air horn in there as well and Reggy's remote receiver should fit in there as well. You will have to pull the front panel around the headlights in order to reach that area. No need to pull the frunk.
Last edited by kevorama; 02-07-2013 at 09:24 AM.
Dream as if you'll live forever, live as if you'll die tomorrow.
―James Dean
-
Very Active Member
Originally Posted by kevorama
I place my FZ-1 under the service panel opposite of the reservoir. The right side, looking at it from the front. I used velcro tape to hold it in place and there's plenty of room. I have a Steibel air horn in there as well and Reggy's remote receiver should fit in there as well. You will have to pull the front panel around the headlights in order to reach that area. No need to pull the frunk.
Awesome, thanks. Thats what I was wanting to know. I have a Stebel horn to install and was wondering if the FZ-1 would fit in there as well.
2007 M109R LE - To many MODS to list. Its cheaper that way!!!
-
Active Member
Originally Posted by NancysToy
I like that location. Easy to reach with the wires, lots of clearance, and convenient to use. I had my outlets in the dash on my 2010, and I would never do that again. If you are still uneasy, the speaker grills are cheap if you change your mind later. Put some masking tape on the grill before you drill, mark it, then center punch it to keep the drill from wandering. I installed mine 1" down and 1" out from center, on the flat part of the grill. I'd recommend removing the grills before drilling. Clean-up is easier that way, and there is no chance of drilling through the speaker...just don't lay the grill on the glovebox to drill it.
Thanks a bunch. I will give it a try and hopefully will have pictures to show when I am done.
Name: Eric Heims
Red 2016 RTS, Diamond R Armrests, Ram X Mount, Doc Humphreys Dampener, BajaRon Swaybar, Spyderpops "Critter Splitter"
"It is the common fate of the indolent to see their rights become a prey to the active. The condition upon which God hath given liberty to man is eternal vigilance; which condition if he break, servitude is at once the consequence of his crime and the punishment of his guilt." John Philpot Curran 1790
-
MOgang Member & Pyro-Man
Originally Posted by M109Dreamer
Awesome, thanks. Thats what I was wanting to know. I have a Stebel horn to install and was wondering if the FZ-1 would fit in there as well.
If you're doing the air horn as well, install it first. I used Velcro, once again, for that. Make sure that you get it as far down as you can. With a little finagling it'll fit nicely and still give you room for the FZ-1. Use the relay that comes with the horn. Don't use your Spyder relay. Also, the horn draws around 18A's if I remember right. The FZ-1 is only designed to run a max of 10A's per circuit and there are 6 banks. I did a 'How To' on the Stebel install. Run a lead with a 30A inline fuse right at the + terminal. I pig tailed off of that (under the service panel) and ran one to the horn relay and the other to the 'Always On' input on the FZ-1. For the 'Switched On +12v' I tapped into the + lead by the wheel for the fender light. Also, when grounding your horn, make sure that there's no paint on the frame or surface you are grounding to.
I hope that helps.
Last edited by kevorama; 02-07-2013 at 09:26 AM.
Dream as if you'll live forever, live as if you'll die tomorrow.
―James Dean
-
Nice, you can also add wire loom to protect wire from chapping and cause electrical fire.
2012 Spyder RT SE5 Brake pedal mod
-
Registered Users

- it is what it is - 2014 Black RT-S - Baja Ron Anti-Sway bar, lots of LEDs, Spyderpops Skid Plate, Twisted Sister HID Driving Lights, Tricled 2nd, 3rd & 4th brake lights, F4 Customs vented windshield, Lamonster highway pegs, Ultimate Tall Boy seat, Utopia backrest

-
MOgang Member & Pyro-Man
Thanks, to you all. I learned a ton when I started my mods, from this site. I try to share what I did right and what I did wrong, in order to help those that are wanting to do these mods on their own.
Please feel free to contact me. There's a good chance that I won't be able to answer your questions adequately, but I'll try... and then I'll send you to Scotty ")
Dream as if you'll live forever, live as if you'll die tomorrow.
―James Dean
-

Originally Posted by kevorama
I have had a few folks ask me about where and how to install a 12v power outlet or cig lighter to power their Garmin or other GPS, iPhone etc. This came from my post, 'How To Mount any Gizmo/ iPhone/ Garmin'
www.spyderlovers.com/forums/showthread.php?40427-How-To-Mount-any-Gizmo-iPhone-Garmin
There are dozens of ways to install a power outlet. You can strap one on to the handle bars or mount one with a RAM BALL mount, but I like a clean install and this was how I did it.
I used these two items and they aren't cheap, but they are the type of quality that you would want on your Spyder. The power outlet came from www.powerlet.com and the secondary fuse block came from Reggy at www.tricled.com
Powerlet has a long proven reputation with motorcycle accessories. Reggy and TricLED has a reputation that's 2nd to none in the Spyder community. The URL's below are linked to the two items that I used.
Powerlet's 12v capped outlet: http://www.powerlet.com/product/pane...rette-socket/6
Reggy's TricLED FZ-1 Fuze Block: http://www.tricled.com/TricLed.com/New_Items.html (scroll down to the Fuze Block item)
Although, the Fuze Block is not necessary to do this, you'll probably eventually need it if you plan on modding out your bike, so you might as well do it while you have all of the panels off, because you'll have to do that in the future anyway. It makes any additional lighting or other mods a piece of cake to install at a later date.
This is the complete outlet kit from Powerlet -
This is the full pic set of Reggy's/TricLED's FZ-1 Fuze Block -
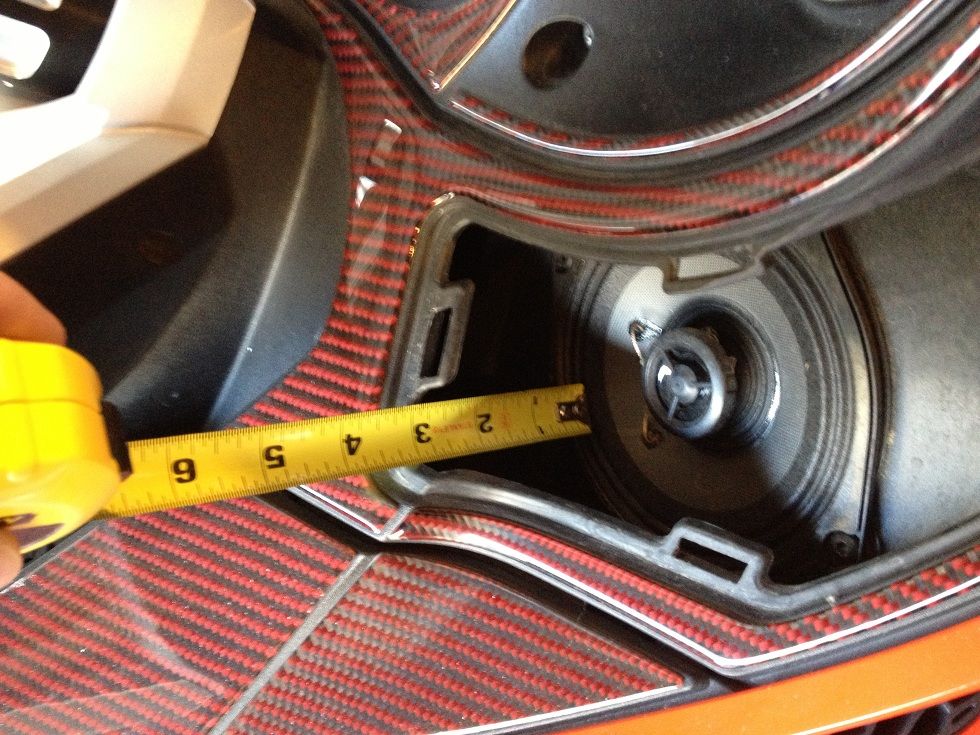
Lets get started! You'll have to remove the right speaker grill, mirrors, upper panels, lower panels, the front panel around the headlights, both service panels (the black ones under the frunk lid) and the interior panel on the right side that gives you access to the manifold (only two screws). Fortunately, all of the other screws are the same size, so keep them in a Tupperware container or something similar. The two screws that hold the interior panel are much longer, so keep those separate.
A few of these pics are a little fuzzy. I had bad lighting and used my iPhone to take the shots, but they are clear enough to understand.
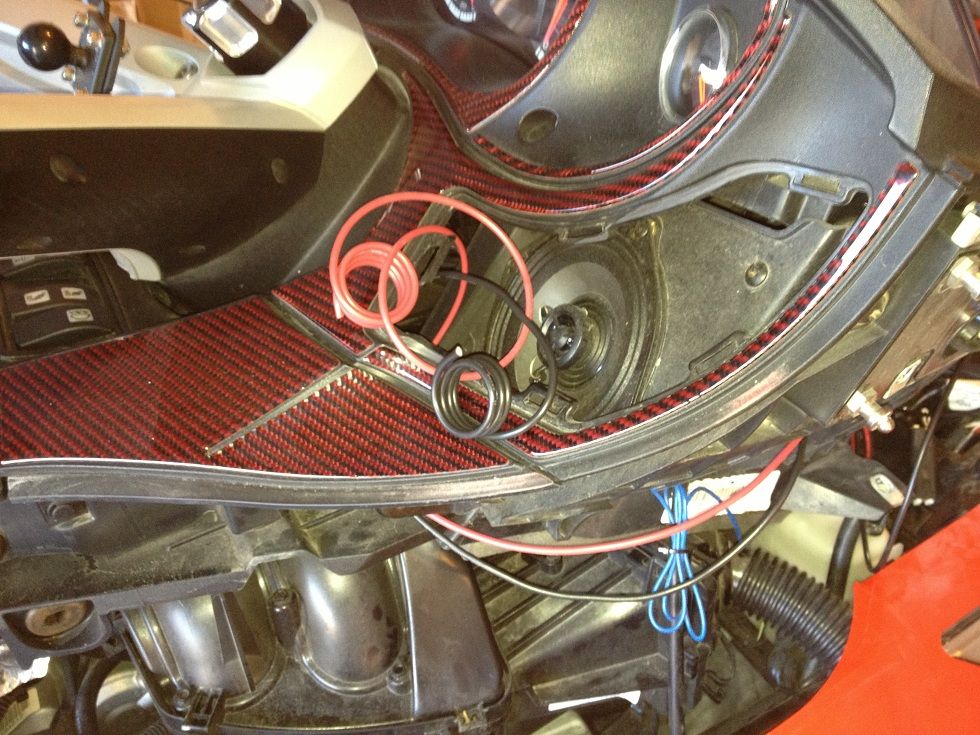
Once you pop off the speaker grill, you'll find that there's a lot of room behind it.
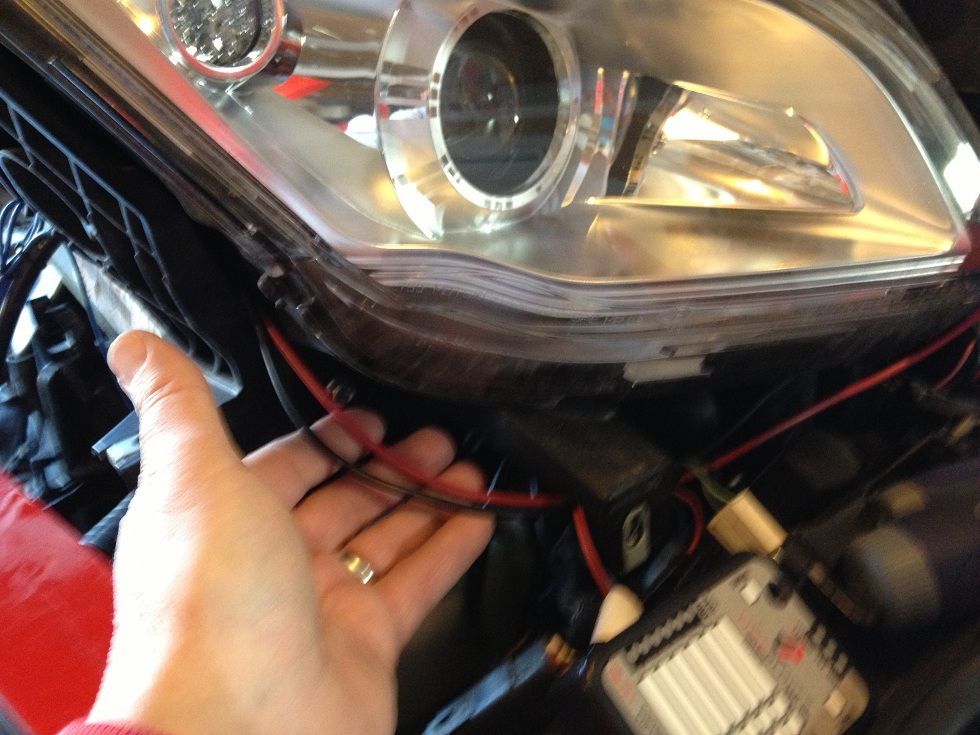
Strip off the ends of your + and - lead wires and route them through, under and around the headlights and front frame work. Ending at the fuse block.
Next, crimp the supplied plug onto the + and - leads coming back from the fuse block or if you opt, a 12G wire with a 10A inline fuse along with the same gauge ground wire. Using the FZ-1, I wired mine into the switched on +12v so that it was only active when the key was turned on. Once you've determined that you did all of the wiring correctly, it's time to put a hole in the speaker grill. This particular model calls for a 1 1/8" hole. I used a corresponding hole saw to do the job. Take care where you put this hole. If you are too close to the tabs it won't click back in. Look at the front and back of the grill very closely to make sure that you don't get it too close to one of the attaching female tab locations. I got it by a mm and I got lucky. I should have paid more attention to the hole location by looking at the back of the grill.
Next, test that it works before you start to button everything back up.
Cool, we have a blue light that shows that it's charging the Garmin.
With the Garmin plugged in, we're good! Notice the shameless plug that I put in for Len's new shop? LOL!
Having done all of that, this is the finished product. A nice and clean install that looks factory. It took me about 6 hours to do all of this, but it also included my taking the Green Filter out and cleaning and reinstalling it.
If you have any questions, please msg me and I'll do my best to help you.
See you at SpyderFest this year!
Kevin
Hi Kevin, You did an awesome job doing all of your installs and I sure wish you lived here in Austin, because you would become my mechanic!  I paid $1100 dollars to have my installs done, only to have them done wrong! When removing the tupperware, we found wires that were just hanging and not attached? Very frustrating! I paid $1100 dollars to have my installs done, only to have them done wrong! When removing the tupperware, we found wires that were just hanging and not attached? Very frustrating!   
-
Registered Users

Very nicely done and beautifully explained...  Thanks Thanks
Originally Posted by kevorama
I have had a few folks ask me about where and how to install a 12v power outlet or cig lighter to power their Garmin or other GPS, iPhone etc. This came from my post, 'How To Mount any Gizmo/ iPhone/ Garmin'
www.spyderlovers.com/forums/showthread.php?40427-How-To-Mount-any-Gizmo-iPhone-Garmin
There are dozens of ways to install a power outlet. You can strap one on to the handle bars or mount one with a RAM BALL mount, but I like a clean install and this was how I did it.
I used these two items and they aren't cheap, but they are the type of quality that you would want on your Spyder. The power outlet came from www.powerlet.com and the secondary fuse block came from Reggy at www.tricled.com
Powerlet has a long proven reputation with motorcycle accessories. Reggy and TricLED has a reputation that's 2nd to none in the Spyder community. The URL's below are linked to the two items that I used.
Powerlet's 12v capped outlet: http://www.powerlet.com/product/pane...rette-socket/6
Reggy's TricLED FZ-1 Fuze Block: http://www.tricled.com/TricLed.com/New_Items.html (scroll down to the Fuze Block item)
Although, the Fuze Block is not necessary to do this, you'll probably eventually need it if you plan on modding out your bike, so you might as well do it while you have all of the panels off, because you'll have to do that in the future anyway. It makes any additional lighting or other mods a piece of cake to install at a later date.
This is the complete outlet kit from Powerlet -
This is the full pic set of Reggy's/TricLED's FZ-1 Fuze Block -
Lets get started! You'll have to remove the right speaker grill, mirrors, upper panels, lower panels, the front panel around the headlights, both service panels (the black ones under the frunk lid) and the interior panel on the right side that gives you access to the manifold (only two screws). Fortunately, all of the other screws are the same size, so keep them in a Tupperware container or something similar. The two screws that hold the interior panel are much longer, so keep those separate.
A few of these pics are a little fuzzy. I had bad lighting and used my iPhone to take the shots, but they are clear enough to understand.
Once you pop off the speaker grill, you'll find that there's a lot of room behind it.
Strip off the ends of your + and - lead wires and route them through, under and around the headlights and front frame work. Ending at the fuse block.
Next, crimp the supplied plug onto the + and - leads coming back from the fuse block or if you opt, a 12G wire with a 10A inline fuse along with the same gauge ground wire. Using the FZ-1, I wired mine into the switched on +12v so that it was only active when the key was turned on. Once you've determined that you did all of the wiring correctly, it's time to put a hole in the speaker grill. This particular model calls for a 1 1/8" hole. I used a corresponding hole saw to do the job. Take care where you put this hole. If you are too close to the tabs it won't click back in. Look at the front and back of the grill very closely to make sure that you don't get it too close to one of the attaching female tab locations. I got it by a mm and I got lucky. I should have paid more attention to the hole location by looking at the back of the grill.
Next, test that it works before you start to button everything back up.
Cool, we have a blue light that shows that it's charging the Garmin.
With the Garmin plugged in, we're good! Notice the shameless plug that I put in for Len's new shop? LOL!
Having done all of that, this is the finished product. A nice and clean install that looks factory. It took me about 6 hours to do all of this, but it also included my taking the Green Filter out and cleaning and reinstalling it.
If you have any questions, please msg me and I'll do my best to help you.
See you at SpyderFest this year!
Kevin
-
MOgang Member & Pyro-Man
Dream as if you'll live forever, live as if you'll die tomorrow.
―James Dean
-
Is there any unused connectors on a 2010 RT (12v with key off) close to either speaker grill that I could tap into for my soon to be install 12v outlet? Don't really want to run all the way back to the battery.
-
MOgang Member & Pyro-Man
Originally Posted by Spyder Envy
Is there any unused connectors on a 2010 RT (12v with key off) close to either speaker grill that I could tap into for my soon to be install 12v outlet? Don't really want to run all the way back to the battery.
Spyder Envy, Scotty could answer this for sure, correctly. I'll give it a go, though. If you want to disconnect your fuel gauge and remove it, people have put them there. There are other places that you could possibly tap into, but getting to them makes running a set of wires from the battery with an inline fuse look easy. It's not difficult to remove the tupperware and run two 12g wires through cheap plastic conduit, but it is a little time consuming. The up side is that if you fry something, it's only the fuse on the + line and can be easily replaced without taking anything off. Just lift the seat, pull the waterproof cap off and replace the fuse. Tapping into the wrong lines and firing up the lighter could cause you a world of hurt that wouldn't be covered by any warranty.
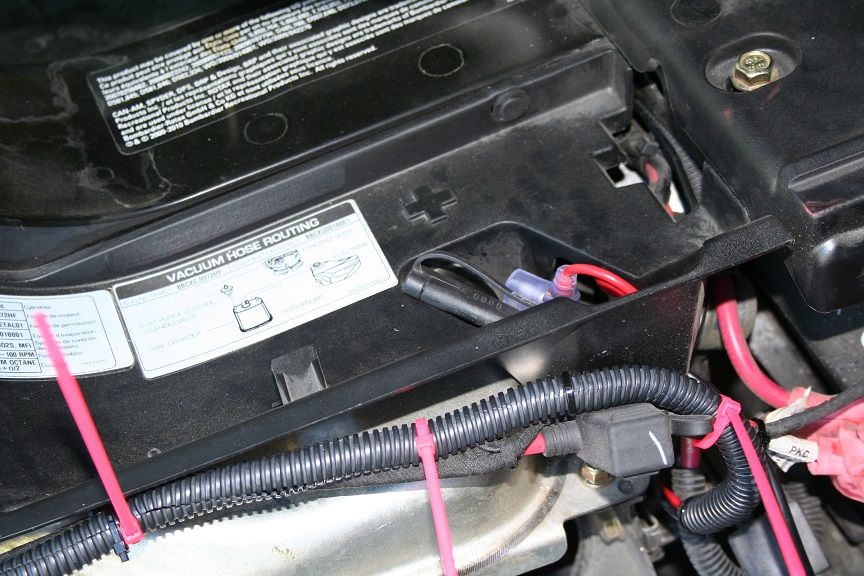
In the photo below you can see the inline fuse (just below the big + symbol and tucked into that recess) and the condiut that it runs through. Just attach the red to the + and the black to any bolt that is grounded to the frame. Just don't try to undo the one that is on the other side that looks like it's from the battery. It is, but you'll never get it back on without some serious headaches.
Dream as if you'll live forever, live as if you'll die tomorrow.
―James Dean
-
Thanks, I am quite comfortable removing the tupperware and doing it that way, but was hoping there was a harness for an accessory tucked away up under the dash that was not in use.
-
Motorbike Professor
Originally Posted by Spyder Envy
Thanks, I am quite comfortable removing the tupperware and doing it that way, but was hoping there was a harness for an accessory tucked away up under the dash that was not in use.
No such luck, but there is an unswitched 10 A accessory harness and connector beneath the front trunk on the left side. You may be able to see it tied near the left shock mount on a 2010. Same circuit as the rear trunk outlet.
-Scotty
2011 Spyder RTS-SM5 (mine)
2000 BMW R1100RTP, motorized tricycle & 23 vintage bikes
2011 RT-622 trailer, Aspen Sentry popup camper, custom motorcycle trailer to pull behind the Spyder
Mutant Trikes Forever!
 Posting Permissions
- You may not post new threads
- You may not post replies
- You may not post attachments
- You may not edit your posts
-
Forum Rules
|


 Reply With Quote