|
-
Registered Users


 Originally Posted by 1VENOM

Done! Used a crescent wrench to widen the female ends of the pipe, this allowed the gasket to slide in with no mallet needed, and anger management was not required.  I coated the inside of the gaskets with Permatex and they slide on effortlessly. I'll give it a run tomorrow to check for leaks and reduced heat.  My left gasket was almost completely burned out. Right one and the lower one were in great shape. Heat wrap is the next project. After I install my new LED rear side markers. Waiting for fedex to show.  Now!!
 You should definitely be able to tell a difference. You should definitely be able to tell a difference.
-
Very Active Member

2 Tips!
Just did mine yesterday and have 2 tips-
I used a couple different stacks of wood for support plus a jack .
1- Follow the Oxygen sensor about 12-14 inches and under the gas tank cut the zip tie that attaches it to another wire AND you add about 6 inches of PLAY in the sensor! Replace zip tie when done!
2- I did it solo and would seat one pipe a 1/2 inch but could never get the other pipe on! Tried a few times from different sides? THEN put a stack of wood under the exhaust and instead of just loosening the bolt on the exhaust I took the Nut off and slid the bolt out so the exhaust pipe itself sat about an inch lower on a stack of wood. Now both ends had the flexibility to seat - I braced them from underneath and lifted the pipe back on the bolt till the end of the process.
3- Hope this helps if you have to do it solo!
 2015 F3 sm6, Custom Dynamics fender lights.
Sea Doo GTI-SE 90 Jet Ski!!
-
Very Active Member

great pics dan, anyone got a link to get the gaskets quick and cheap?
-
I did mine a couple of days ago. I could not have done it without the picts and instructions provided by Dan. Thanks much. 
I got my gaskets at a local Honda store. I think $7.00 per. Seth, I know you can get them cheaper on line. Just google the part no.
Love my 

Statistics show that most motorcycle accidents are caused by a defective nut holding the handlbars.
-
Thank you, WackyDan! Did the wife's tonight and now the only exhaust noise is coming out of the muffler.
-
Very Active Member

Not a misprint
Great post Wacky Dan but I don't think the service manual had a misprint. 13 Nm equals 115 pounds force inch. Maybe you confused it with pounds force foot wich would be 9.6. In that case you could have over torqued it.
-
Very Active Member

Originally Posted by billybovine
Great post Wacky Dan but I don't think the service manual had a misprint. 13 Nm equals 115 pounds force inch. Maybe you confused it with pounds force foot wich would be 9.6. In that case you could have over torqued it.
Thanks for pointing that out.... I went a bit over, but not too over... They seem to be holding fine.
WackyDan - Fun, not crazy.
Charlotte (Matthews), NC
Silver Moon SM5 - V35 and V46 Givis, CHAD, Motolight 35w steering lights, Dash Powerlets, Helibar risers, Garage door opener, Eastern Beaver PC-8, Digital voltmeter, Kewl Metal Intake, Evoluzione Sway Bar, RT Shocks and Juice Box PRO.
*Mower deck in development*
2008 model -new in crate, April 09
26,000 miles.
Looking for other Charlotte area riders to cruise with and compare Spyders.
HAPPY SPYDER OWNER
-
I've been reading, re-reading and re-re-RE-reading this thread as I keep imagining that my Spyder is getting louder...
Thanks for a great write-up; I'm going to print this whole thing out when it comes time to crawl around under the bike a little bit...
-
Active Member

Y Gasket Question
What are the symptoms that you need to replace these gaskets. I have 7,500 miles on my RS SE5.
Thanks
Originally Posted by WackyDan
Tools: Metric sockets, Socket extensions, Pry bar (optional), ATV lift or ramps, and either wood blocks or floor jack to support Y manifold.
Oh... And a big rubber mallet and anger management. * Very important.
A second pair of hands is required for only five minutes towards the end of the install. My wife was able to do this no problem.
Parts: Either the BRP Y gaskets or the Honda GL 1800 Gaskets. The Honda Gaskets will last longer according to others here that have used them. They are also cheaper. Part number for the Honda GL1800 gasket is 18392-MAM-000
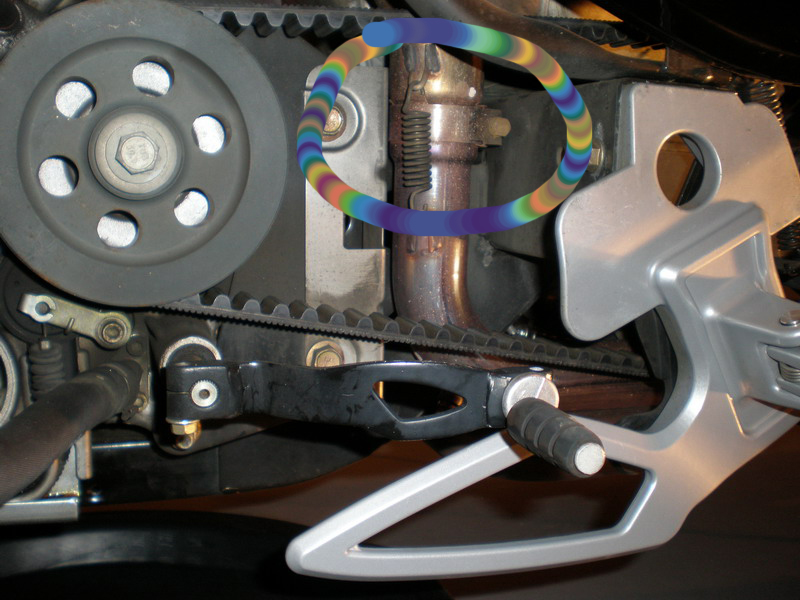
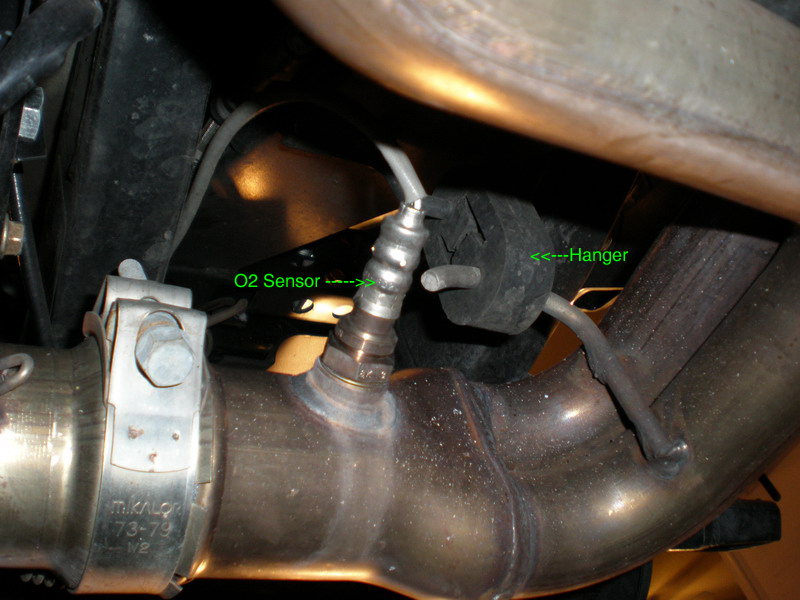
First... This is what we are talking about below in the picture. You will need to remove the lower kick panels on both sides for the best access. I found that to be easiest, though getting the pipes back together was a challenge. Left side and then right side in pics below.
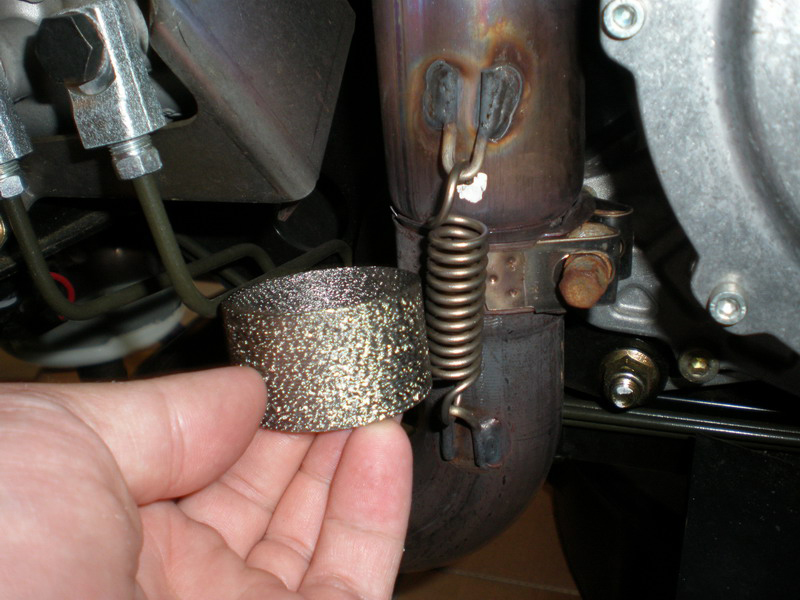
This is what we need to get in there. A new Gasket on the left and right side.
You will need to have the Spyder elevated several inches to do this comfortably.
Before you start attacking the pipes, have a floor jack or stack of wood handy to support the entire Y pipe manifold from underneath.
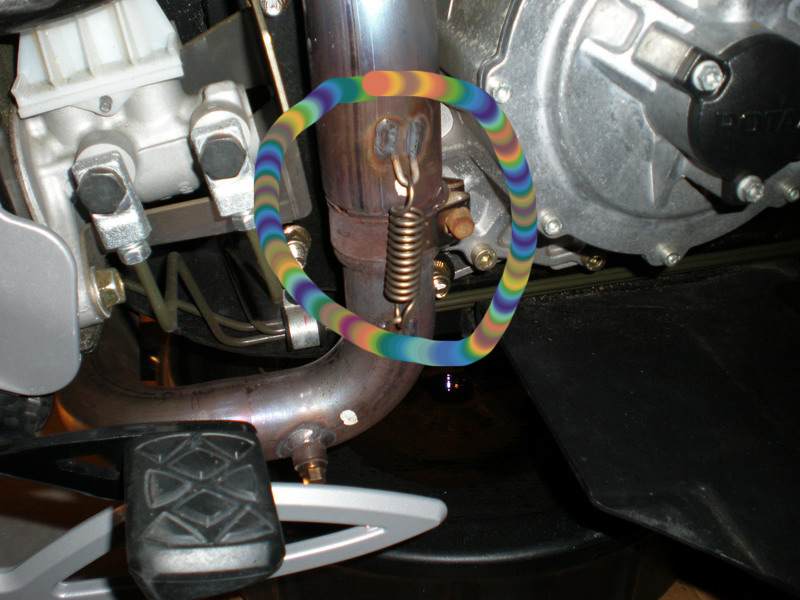
To start disassembly, you will need to remove the spring on each side. I used a pair of vice grips but others have used some sort of hooked tool.
You then will want to loosen the 10mm bolt on each clamp assembly in the pictures above.
You will need to unhook the rubber exhaust hanger that is supporting the whole assembly. it is easier to slide it off the top hook. Please make sure you have blocking in place to support the pipes, as you do not want to put pressure on the O2 sensor wire harness which feeds back up above the swing arm.
Hanger and O2 sensor are noted in the following pics:
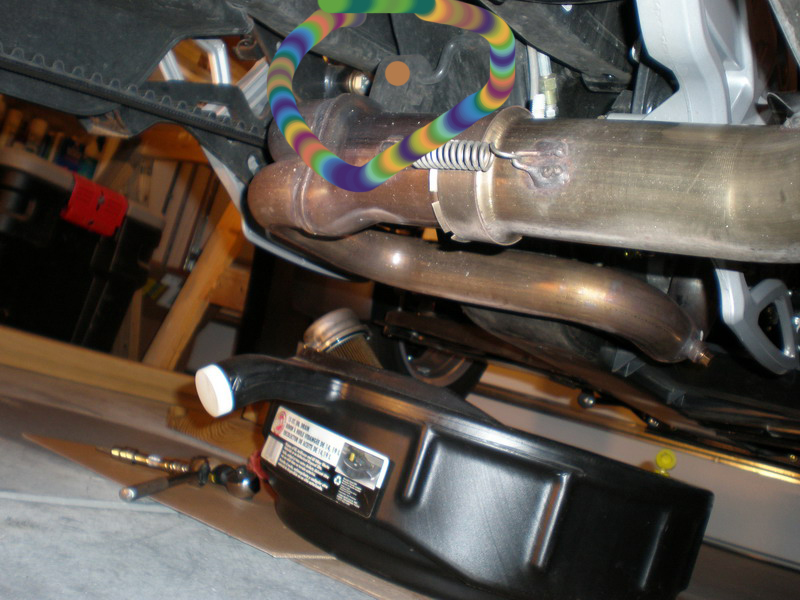
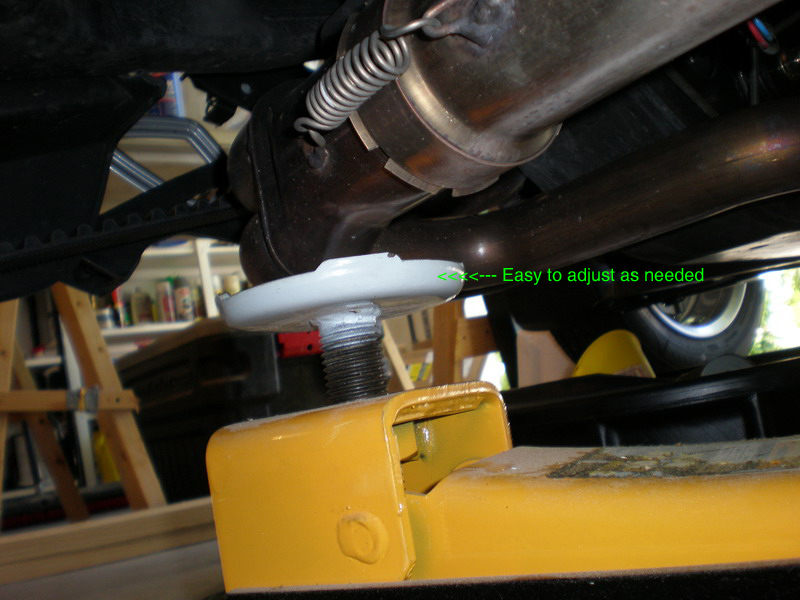
Picture with the jack in place to support the whole assembly as I worked it loose. Floor jack was nice as I screwed the white plate on the jack up or down as I needed play... You could do the same with multiple wood boards in a stack.
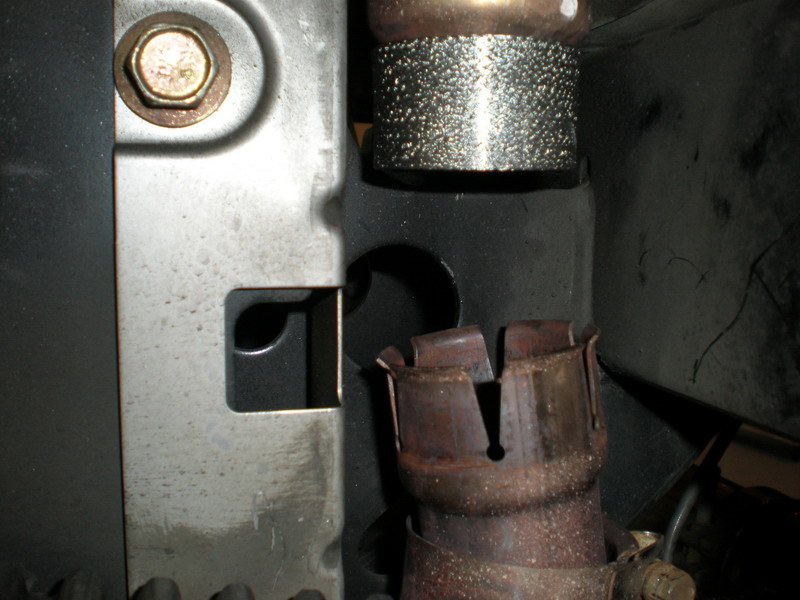
Once you have the jack in place, you can loosen the muffler bolt found here:
Now you can fully loosen the pipe clamps if you haven't already and work the Y manifold free from the headers.
Once they are free, you will need to pull the old gaskets out. I found pulling them out to be a challenge. The left side was in great shape and was the hardest to pull out. The right side wasn't terrible, but it wasn't in as good shape as the left side and pulled out rather easily. In fact, I was surprised by the right side. I thought it would have been in worse shape than it was. You will probably find that the old gaskets are baked onto and into the female ends of the Y-Pipe.
No you can take the new gaskets and place them on the male ends of the header pipes which is the header side of the connection. It should look like the picture below.
That is about it. A second pair of hands is handy. Let me say that getting the pipes up over the new gasket and fully seated required some anger, some light prying, and the application of anger via a large rubber mallet. Once I had the lower pipe on one side started by hand, I used the mallet to smack that side from the bottom of the manifold. Got one side up half way, had my wife hold it to make sure it didn't slip, and then worked on the other side. Used the mallet to fully seat them, partially tightened the clamps, and reinstalled the springs.
The service manual calls for 13 Nm or 115 pounds of torque. Pretty sure that 115 is a misprint as that is way different than 13Nm. I set the torque wrench at 15 pounds and finished tightening. The weird thing is that as the gaskets compress a bit and it screws with the torque wrench actually working normally. Just had to be careful.
EDIT AND NOTE ABOUT TORQUE ON THE CLAMPS ( FROM BILLYBOVINE) : Great post Wacky Dan but I don't think the service manual had a misprint. 13 Nm equals 115 pounds force inch. Maybe you confused it with pounds force foot wich would be 9.6. In that case you could have over torqued it.
After all that, make sure the rubber hanger is put back in place, and the muffler bolt is tightened again!
Start up the bike, let it run for 5 minutes or so. You will smell the new gaskets "cooking" in. After that I put the wrench back on the clamps for another 1/4 turn or so.
I think that sums it up. This wasn't hard at all. I already had the bike torn down for oil change and plug changes so this was a good time to do these and upgrade to the honda parts.
My biggest pain was just getting the pipes back together as they don't line up nicely, though yours might versus mine. I could do this in under an hour now that I've done it once.
I hope this helps those that don't understand what the Gaskets are or where they go and some of the steps in photos needed to get them done. If I missed something, let me know.
-
Motorbike Professor

Originally Posted by Crisis
What are the symptoms that you need to replace these gaskets. I have 7,500 miles on my RS SE5.
Thanks
Increased heat on thighs, especially on right side; Louder exhaust; possible exhaust popping or "backfiring"; visible leakage upon removal of body panels.
-Scotty
2011 Spyder RTS-SM5 (mine)
2000 BMW R1100RTP, motorized tricycle & 23 vintage bikes
2011 RT-622 trailer, Aspen Sentry popup camper, custom motorcycle trailer to pull behind the Spyder

Mutant Trikes Forever!
-
Very Active Member

No need for a mallet. Line-up both sides, then use a floorjack to push each pipe up. Worked perfectly today, no swearing.
Enjoying now: 2015 Spyder F3 SE6, 1970 Indian MM-5A, 1972 Suzuki RV90J Rover, 2017 Indian Chieftain (wife's)
Wish-I-had-kept-them: 2008 Spyder GS SE-5, 1967 Shelby GT500 w/Paxton supercharger, 1972 DeTomaso Pantera, 1991, 1992 & 2001 Acura NSX's, 2012 V-Star 950 Tourer, various 2-, 3- and 4-wheelers
-
Take your time goin back togetherFinally got out and replaced my Y gaskets this past weekend.
This thread with associated pictures was invaluable!!!! Thanks to all who contributed!!!
Some observations;
I cut the zip tie on the O2 sensor wire to give me more slack....worked good.
Take your time goin back together. If its all lined up right it goes pretty easy.
-
Very Active Member

Originally Posted by Crisis
What are the symptoms that you need to replace these gaskets. I have 7,500 miles on my RS SE5.
Thanks
I was installing BRP passenger peg extensions and Baja Ron's spark plug wires tonight and I started my 2009 GS up with the side panels off and heard a loud rumble...If you put your hand down by the exhaust pipe where the gasket is before the exhaust gets hot,you can feel it leaking....I didn't notice any extra heat or noise..It probably happens so gradual,you don't realize it...now I know why i saved this thread to my favorites...What a big help and great instructions!..
-
My RT is in for its 9000 miles tune up...(+ rear tire, swaybar) and an exhaust leak: looks like the Honda gasket is only for the RS not the RT???
-
Registered Users

 excellent tutorial excellent tutorial
Add me to the list of thankful backyard mechanics, specially since i did it in the back yard because I have no garage. This was an excellent instruction.
The hardest part was removing all the plastics. I bought some ramps and a rubber mallet as suggested, i had everything else I would need. Took a ride to the Honda dealer and picked up a couple of Y gaskets. I went through the owners manual to remove plastics, first time for me. No problems with clamp bolts although next time they may be more rusted. The right side gasket was completely missing, hopefully it disintegrated and didn't get stuck some where downstream. The left side looked good and it came out really easy. Put in new gaskets and the pipes went back together great with a little persuasion from my new rubber mallet. no 2nd person assistance needed. Torqued as stated and then ran the bike for a while then re-torqued. replaced springs and hangers and plastic. Sounds a whole lot better now.
This forum is awesome
Stay Safe!
PaulB
2011 Orange/Black Spyder RS-S
-
GOS Founding Member (Girls On Spyders)
-
Registered Users

Replaced my gaskets yesterday with Honda parts. Right side half way gone and left pretty brittle. Video was excellent tutorial. Thanks
-
Very Active Member
Thanks for the feedback guys. I enjoyed doing some of the videos and how to posts a lot. I've been mostly MIA due to work and Leah.
Leah is the perfect excuse for anything actually.
WackyDan - Fun, not crazy.
Charlotte (Matthews), NC
Silver Moon SM5 - V35 and V46 Givis, CHAD, Motolight 35w steering lights, Dash Powerlets, Helibar risers, Garage door opener, Eastern Beaver PC-8, Digital voltmeter, Kewl Metal Intake, Evoluzione Sway Bar, RT Shocks and Juice Box PRO.
*Mower deck in development*
2008 model -new in crate, April 09
26,000 miles.
Looking for other Charlotte area riders to cruise with and compare Spyders.
HAPPY SPYDER OWNER
-
Very Active Member

-
Very Active Member

Thanks. Is this the same as a 12RT? Invaluable info! 
From Deep in the Hart of Texas!
2012 RT A&C bought new 42312 sold July 2018 56k miles currently driving a 2014 RTSE6 LTD bought October 2018 w 6800 miles nicely farkled

-
Very Active Member
Originally Posted by AbNormy
Thanks. Is this the same as a 12RT? Invaluable info!
From Deep in the Hart of Texas!
Yup... For the most part anyway, you guys with the RTs have different panels to deal with, but the same design of the pipes, etc are there.
Not sure about the 2013's, but they are probably close enough due to have the same engine. The new BRP gaskets are said to be improved so the first factory set should last longer than the old ones on the newer Spyders... I have 20k on my honda gaskets and no issues so far.
WackyDan - Fun, not crazy.
Charlotte (Matthews), NC
Silver Moon SM5 - V35 and V46 Givis, CHAD, Motolight 35w steering lights, Dash Powerlets, Helibar risers, Garage door opener, Eastern Beaver PC-8, Digital voltmeter, Kewl Metal Intake, Evoluzione Sway Bar, RT Shocks and Juice Box PRO.
*Mower deck in development*
2008 model -new in crate, April 09
26,000 miles.
Looking for other Charlotte area riders to cruise with and compare Spyders.
HAPPY SPYDER OWNER
-
Motorbike Professor
Originally Posted by WackyDan
Yup... For the most part anyway, you guys with the RTs have different panels to deal with, but the same design of the pipes, etc are there.
Not sure about the 2013's, but they are probably close enough due to have the same engine. The new BRP gaskets are said to be improved so the first factory set should last longer than the old ones on the newer Spyders... I have 20k on my honda gaskets and no issues so far.
 The 2010-2012 RT pipes/gaskets are not the same design as the 2008-2012 GS/RS...nor do I believe they are the same size. The 2010-2012 RT pipes/gaskets are not the same design as the 2008-2012 GS/RS...nor do I believe they are the same size.
-Scotty
2011 Spyder RTS-SM5 (mine)
2000 BMW R1100RTP, motorized tricycle & 23 vintage bikes
2011 RT-622 trailer, Aspen Sentry popup camper, custom motorcycle trailer to pull behind the Spyder
Mutant Trikes Forever!
-
Very Active Member
Originally Posted by NancysToy
The 2010-2012 RT pipes/gaskets are not the same design as the 2008-2012 GS/RS...nor do I believe they are the same size.
Good to know. Anyone ever find a honda or other alternative for those models then?
2008 GS JOINT DE TUYAU *SLIP JOINT
707600546 (replaces 707600337)
2010-2013 RT and ST JOINT TUYAU *SLIP JOINT
707600650
Last edited by WackyDan; 08-09-2013 at 10:44 AM.
WackyDan - Fun, not crazy.
Charlotte (Matthews), NC
Silver Moon SM5 - V35 and V46 Givis, CHAD, Motolight 35w steering lights, Dash Powerlets, Helibar risers, Garage door opener, Eastern Beaver PC-8, Digital voltmeter, Kewl Metal Intake, Evoluzione Sway Bar, RT Shocks and Juice Box PRO.
*Mower deck in development*
2008 model -new in crate, April 09
26,000 miles.
Looking for other Charlotte area riders to cruise with and compare Spyders.
HAPPY SPYDER OWNER
-
Y Gasket
Can someone give me the Honda part numbers for these gaskets please? Thank you
-
Exhaust Y Gasket replacement
Originally Posted by SpyderWolf
You should definitely be able to tell a difference.
Part Numbers please. Thnx
 Posting Permissions
- You may not post new threads
- You may not post replies
- You may not post attachments
- You may not edit your posts
-
Forum Rules
|


 Reply With Quote
 I am existing right now, would give anything to live again. Fix my sci and you have everything I own.