|
-
 Shad bags installed, differently Shad bags installed, differently
I bought the shad bag kit when I got my bike last year, but they didn't arrive till recently. I installed the bags and immediately hated them. The brackets are huge, they stick way out, and it looked like I had been rear-ended by a jungle gym. Fortunately they were made of regular old metal so I cut them apart and rewelded them back the way I wanted. I had to give up the grab handles but my wife has her own bike and I almost never carry passengers so NBD, plus when the bags aren't on the racks themselves act as grab handles.
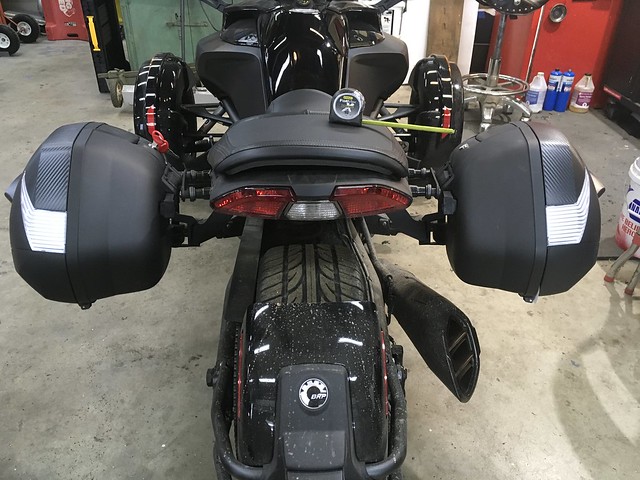
Not many pics of the in progress because this was about revision 6, but the short version is that I cut the mounting tabs off the actual brackets then started holding the brackets up various places till I found a good spot, then I'd tack weld it back together in place and check for clearance issues. Finally ended up putting the tubular bag mount above the frame bracket, which I flipped upside down and milled a slot in for the bag lock to fit in. Moves the bags back about 6" and up about 4" relative to stock, and in about 3". I should have taken more pics of the brackets before I cut them up, but if you look around on here you can find pics. I also cut away parts of the bracket that were unnecessary, and ground down and smoothed the welds on the very bottom of the bracket. If I'm honest I'm pretty disappointed in the way the brackets came stock. The shad bags come off by pivoting up and forward which means they can't be placed under the stock grab handles, so they had to move the bags way out to clear. If they used something else like a Hepco Becker bag that side mounts they could have been much less obtrusive. Oh well, it is what it is and I'm much happier now. I'm still in the middle of painting them so all pics show raw steel.
 Untitled by Uncle Grr!, on Flickr Untitled by Uncle Grr!, on Flickr
Stock
 Untitled by Uncle Grr!, on Flickr Untitled by Uncle Grr!, on Flickr
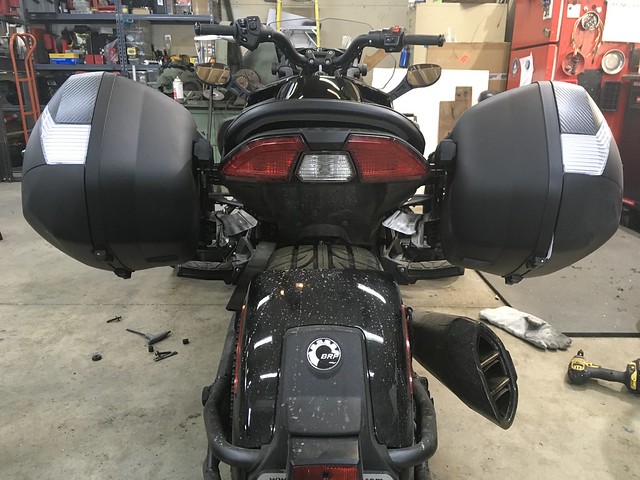
Fixed
 Untitled by Uncle Grr!, on Flickr Untitled by Uncle Grr!, on Flickr
Comparison
 Untitled by Uncle Grr!, on Flickr Untitled by Uncle Grr!, on Flickr
After
 Untitled by Uncle Grr!, on Flickr Untitled by Uncle Grr!, on Flickr
Bracket closeup
 Untitled by Uncle Grr!, on Flickr Untitled by Uncle Grr!, on Flickr
Bracket, further
 Untitled by Uncle Grr!, on Flickr Untitled by Uncle Grr!, on Flickr
Bags on
 Untitled by Uncle Grr!, on Flickr Untitled by Uncle Grr!, on Flickr
-
-
Active Member

I also have a SHAD top box on my RS-S and I use them on my two wheelers too. I have the SH29 for the BMW Funduro and the SH45 Top box on the Can Am. I had the full set on an FZ09 and I loved them. They are completely water proof, no leaking, and the latching and locking is fast and secure. Nice looking bags on your F3, nice work.
20191218_143852.jpg
Kraig B. Kumlin, M.M., M.C.P. (Retired)

Only Two States Left to Visit on MC or Trike, RI and CT
2012 RS-S , Baja Ron Plug Wire Kit and NGK Iridium Plugs Grey and Black
-
Very Active Member

-
Active Member

-
Active Member

Raprider (Rich)
2016 Can-Am Spyder ST-S SE5 Steel Black Metallic ( Blackbird)
BRP Audio, Heated Grips, Fog Lights, Passenger Backrest, Givi Saddlebags/Top Case
BajaRon Swaybar, TricLed Wide-Vu Mirrors, Lamonster Ram mount and X-grip, Sena 20S Evo Dual
TricLed Sequential Front SpyderFenderz, Dual Color Run/Brake/Turn LEDs, Brake Flasher
Kumho Ecsta AST installed on rear 4/2021
1996 Yamaha Virago 750 (Vera) - still riding
1987 Honda Shadow 500 (Shady) - sold
1982 Honda Rebel 250 (Little Reb) - sold

-
Very Active Member

2015 RT-Ltd SE6 and F3S SE6, both with a number of commercial add-ons plus my own tweaks.

-
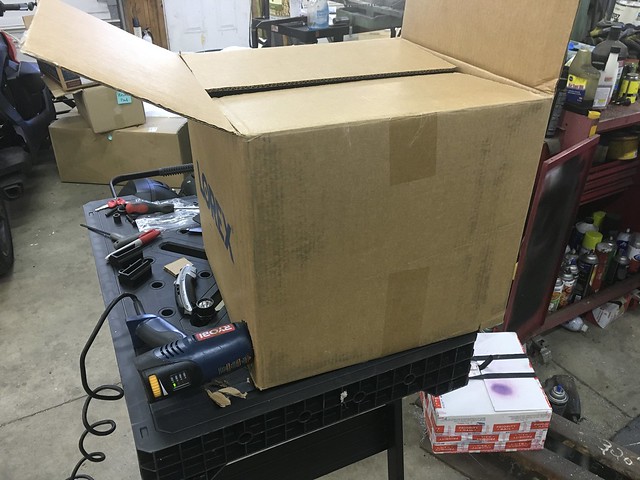
So I finally got a chance to put paint on the brackets. Three coats of VHT epoxy black with a few days to cure, then a few heavy coats of VHT wrinkle finish black to match the OEM powdercoat look. I told my wife I needed to use the oven to cure the paint and she became very unreasonable, very quickly. She suggested, among other things, that I should buy my own oven for the barn (which I was planning on anyhow so I can powdercoat but was beyond the scope of this project.) I figured I only needed 200*F for 20 minutes so I should be able to come up with something. I lined a big cardboard box (ignition point 450*F) with some foil backed insulation I had leftover from a different project, then drilled a hole in the bottom corner and the opposite side top corner. Jammed a heat gun in the bottom hole and turned it on while I stood by with a fire extinguisher. No problem, and after a few minutes of fiddling I managed to get the temperature to stabilize at around 200*. Dropped the racks in, set the timer, and Voila! Nicely cured wrinkle finish. In the wife's defense, it did rather stink afterwards. Anyway, installed the now complete racks with a bit of blue locktite. On to the next project.
 Untitled by Uncle Grr!, on Flickr Untitled by Uncle Grr!, on Flickr
Cardboard oven
 Untitled by Uncle Grr!, on Flickr Untitled by Uncle Grr!, on Flickr
Temp stabilized
 Untitled by Uncle Grr!, on Flickr Untitled by Uncle Grr!, on Flickr
Paint texture
 Untitled by Uncle Grr!, on Flickr Untitled by Uncle Grr!, on Flickr
Installed
-
SpyderLovers Sponsor

 Originally Posted by whodat

I bought the shad bag kit when I got my bike last year, but they didn't arrive till recently. I installed the bags and immediately hated them. The brackets are huge, they stick way out, and it looked like I had been rear-ended by a jungle gym. Fortunately they were made of regular old metal so I cut them apart and rewelded them back the way I wanted. I had to give up the grab handles but my wife has her own bike and I almost never carry passengers so NBD, plus when the bags aren't on the racks themselves act as grab handles.
Not many pics of the in progress because this was about revision 6, but the short version is that I cut the mounting tabs off the actual brackets then started holding the brackets up various places till I found a good spot, then I'd tack weld it back together in place and check for clearance issues. Finally ended up putting the tubular bag mount above the frame bracket, which I flipped upside down and milled a slot in for the bag lock to fit in. Moves the bags back about 6" and up about 4" relative to stock, and in about 3". I should have taken more pics of the brackets before I cut them up, but if you look around on here you can find pics. I also cut away parts of the bracket that were unnecessary, and ground down and smoothed the welds on the very bottom of the bracket. If I'm honest I'm pretty disappointed in the way the brackets came stock. The shad bags come off by pivoting up and forward which means they can't be placed under the stock grab handles, so they had to move the bags way out to clear. If they used something else like a Hepco Becker bag that side mounts they could have been much less obtrusive. Oh well, it is what it is and I'm much happier now. I'm still in the middle of painting them so all pics show raw steel.
Untitled by Uncle Grr!, on Flickr
Stock
Untitled by Uncle Grr!, on Flickr
Fixed
Untitled by Uncle Grr!, on Flickr
Comparison
Untitled by Uncle Grr!, on Flickr
After
Untitled by Uncle Grr!, on Flickr
Bracket closeup
Untitled by Uncle Grr!, on Flickr
Bracket, further
Untitled by Uncle Grr!, on Flickr
Bags on
Untitled by Uncle Grr!, on Flickr
BIG improvement looks great.
 Posting Permissions
- You may not post new threads
- You may not post replies
- You may not post attachments
- You may not edit your posts
-
Forum Rules
|


 Reply With Quote


