|
-
Very Active Member

 RIVCO RT Highway Peg Mount Set - Review RIVCO RT Highway Peg Mount Set - Review
I mounted my RIVCO Highway Pegs (and brackets) today. Since there have been a lot of questions about highway pegs on the forum recently, I thought I'd take the time to write up a review of the RIVCO mounts, so that folks looking at these could have more information with which to assess them.
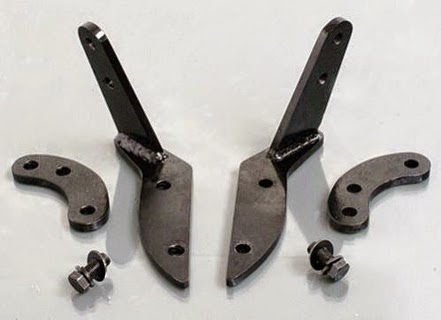
I purchased the RIVCO Black Highway Peg Mount Set (CAOO4-RTB) made specifically for the 2013 and newer RT with factory floor boards. I ordered the black powder coated brackets and pegs, because I thought they would look best with my Spyder, but these also come in chrome as well. Note that these are intended only for BRP factory floorboards, as the mounting brackets are cut to exactly match the forward outside curve of the factory boards.
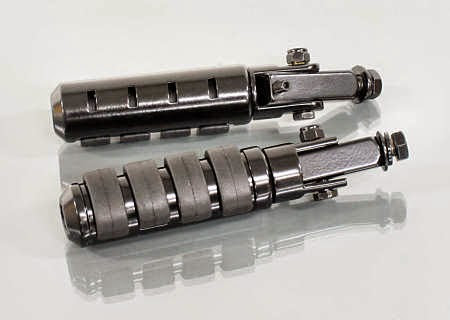
The mount kit does not come with the pegs themselves - so you have to buy a set of pegs as well. The brackets will fit, without any modification, any highway pegs that mount in a 3/8" hole, which includes all RIVCO pegs, as well as many others. I purchased the RIVCO Anti-vibration pegs, also in the powder coated black color (PEGSBK). I purchased the mounting kit and the pegs from Value Accessories. (Both Value Accessories and RIVCO are currently forum sponsors.
 ......... .........
QUALITY, FIT, and INSTALLATION:
Both the mounting kit and the pegs are rugged and very high quality. The mounts are bolted to the underside of the floor boards with hefty 3/8" bolts, washers, lock-washers, and lock nuts. They are extremely rigid when mounted, and the bolts fit nicely below the rubber pads on the boards. As stated above, the brackets are made to exactly align with the outside curve of the factory floor board bases. You cannot see the mounting plates when the job is done, except for the very edge of them. The kit provides a cut-out template that you lay out on the top of the floor board bases, and it tells you exactly where to center-punch marks for drilling. You don't even need to measure. Next you screw on the extender brackets to the mounts, using sturdy 1/2" machine bolts, washers, lock-washers, and a star-washers. That combination makes their position easy to adjust and holds them firmly in place when tightened. RIVCO says that these can mount in a variety of positions, but really the only position that makes sense is to point the extenders forward over top of the black plastic splash guards that are mounted on the RT in front of the floor boards. I tightened mine in a position about an inch above those plastic splash guards, so as to leave some room for the right break-away floor board to drop, in the event of hard braking in an emergency. (More on that later.) Then the pegs simply mount to the upper hole in the extension brackets. The entire installation procedure is extremely easy, and well documented with instructions. Here is a link to the installation instructions on RIVCO's web site.
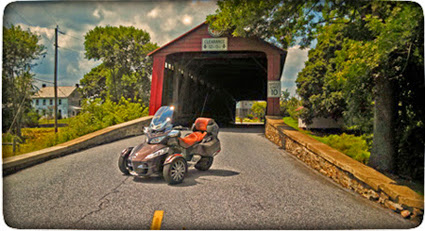
Here are some pictures of the new highway pegs on my 2013 Spyder RT Limited, showing the pegs in both the extended and upright positions...


PROS and CONS:
First the "PRO's"
- VERY well made with sturdy, rugged, and attractive components.
- They come in both powder-coated black and chrome to suite your taste.
- Can use with a variety of highway pegs.
- Easy and quick installation - no measurements necessary.
- With these brackets in place, you can still remove the maintenance access panels located beside them.
- The brackets place your highway pegs in a comfortable position close to the sides of the Spyder. Your legs are not spread out any further than necessary.
Now the "CON's"
- I thought just a little more length on the extension brackets would be helpful, so as to allow you to stretch your legs out just a little more. (I have long legs.)
- If your Spyder spews a lot of heat out through the side vents (i.e. the 2013 RT), your ankles are directly in the path of the heat. (A good pair of riding boots may overcome this problem.)
- The right bracket will come to rest on the plastic splash guard, in the event that the break-away floor board drops in an emergency braking application. HOWEVER, this may NOT be the problem that it may appear to be at first glance. Remember that in an emergency stop, you will be stomping on the brake pedal - NOT the floor board itself. So while the break-away floor board would normally fall about three inches, the brake pedal will likely only need another 3/4 of an inch or so at the most. So, if you mount the bracket an inch above the plastic splash guard, there will be very little pressure exerted on the guard as the peg bracket falls on it. Therefore damage to the splash guard should be extremely minimal, if any at all. (See picture below.)
Here is a picture of the right bracket resting on the top of the plastic splash guard on my Spyder, with the break-away floor board deployed....

With the floor board dropped to where the highway peg bracket rests on the top of the splash guard, note how much additional room there is available for brake pedal travel. (See the "CON's" section immediately above.) I am not personally concerned about this, because on my Spyder, while I can manually trip the break-away board by reaching underneath and tripping the lever that rests on the brake pedal arm, I CANNOT deploy the board by stomping on the brake pedal no matter how hard I stomp on it. (Perhaps if I were very low on brake fluid, or if there were air in the lines stomping on the pedal would deploy the break-away board.) Your experience in this area may vary, however, see the note under "CON's" above with respect to likely damage to the splash guard in the event of emergency braking.
COMFORT WHILE RIDING:
I did take a test ride with my new highway pegs after the installation was complete. I was surprised to note that the riding position with my legs extended to the pegs was not as comfortable as I expected it to be. But that is probably just me. I am not personally used to riding with highway pegs, so it may take me a bit of time to find them more comfortable. I won't be using these while "riding around town", but I do believe that I will welcome the opportunity to stretch my legs from time to time while on a long highway trip. For those who are used to riding with highway pegs, I suspect that these will be very comfortable, as the position of the brackets will bring your feet closer to the Spyder than some other peg brackets currently on the market. Also, your heel can lightly rest on the top of the splash guard without exerting undue pressure on it.
That's it for this review. I hope some find it to be helpful.
Last edited by robmorg; 07-01-2016 at 02:42 PM.
-
Very Active Member

Very good review, I know there will be some folks who will benefit from this. 
Cruzr Joe
2018 F3 Limited, BRP Driver Backrest, Spyderpops Lighted Bump Skid, Dual Spyclops Light, Mirror Turn Signals, Laser Alignment, Engine LEDs, Fog Lights With Halo's, Cushion Handgrips, BRT LEDs, and Under Lighting, Lamonster IPS, (with Clock), F4 25" Vented Windshield with Wings, Airhawk "R" Cushions. Position 4 Brake setting, Short reach Handlebars, Dash Mounted Voltmeter and 12 Volt Plug. Set of 3rd pegs. Extended Passenger Seat. Exterior BRP Connect setup, Ultimate Trailer
-
Excellent Review
Thank you for an excellent, unbiased review. I have one suggestion to supplement your installation. I suggest that you consider the block off plate for the furnace hole. This would require you to remove the plastic panel under the engine to let there be somewhere for the hot air to go. I installed Madstad pegs and had to block off the hot air cooking my ankle. Baha Ron sells a nice product that is reasonably priced and so far seems to be working for me.
What do others suggest ?
Remember to "Live before you die".
-
Very Active Member
 Originally Posted by Ben Burped

Thank you for an excellent, unbiased review. I have one suggestion to supplement your installation. I suggest that you consider the block off plate for the furnace hole. This would require you to remove the plastic panel under the engine to let there be somewhere for the hot air to go. I installed Madstad pegs and had to block off the hot air cooking my ankle. Baha Ron sells a nice product that is reasonably priced and so far seems to be working for me.
Ben,
Thanks for the suggestion. I have done a LOT of modifications on my 2013 RT to conquer the heat problem. But mostly I concentrated on the heat coming up around the seat and the heat inflicted on the fuel tank, which may cause the fuel to boil. (You can see what I have done on my "Farkles Page", which is linked in my signature.) I purposefully did not install the block off plate for a couple of reasons. First, with my feet on the floor boards it really doesn't bother me that much. But also, I did not want to remove that lower panel, and I did not want to direct ANY additional heat into the engine compartment which could have the potential to cause problems with overheated fuel. I'd rather as much heat as possible exit through that "furnace hole."  At this point, before doing any more heat mods, I'm going to wait for the 2013 RT recall coming up in a few months. At this point, before doing any more heat mods, I'm going to wait for the 2013 RT recall coming up in a few months.
-
Very Active Member

I have the same foot pegs in chrome to match my chrome foot boards on my 2014 RT Limited. I love em. Easy easy to install. Nice folks at Rivco also. Have Rivco pegs on my BMW 650GS. Good quality products.
Jack
All my life I wanted to be somebody, now I realize I should have been more specific.
2019 Specialized E-Bike COMO 2.0
2018 Jeep Grand Cherokee Overland
2018 Tiffin Phaeton 37BH Motorhome
2015 BMW R1200R LC
2014 RTL SE6 Pearl White
2012 RT-622 trailer viper red
2014 Look 7x12 motorcycle trailer silver and black
2011 Polaris Ranger green
2013 GMC Yukon Denali XL silver oak
2016 Can Am Maverick
-
Rob, thanks for taking the time to post your review. Jack, thanks for your recommendation. I"ll be riding up to Rivco to buy this setup within the next few weeks.
MEP
2019 F3 Limited

-
Active Member

-
Very Active Member

Thank you for the well organized and unbiased review. It is very helpful.
Gary
 States visited by Bike
-
Very Active Member

Excellent review! Well done!
-
Very Active Member
Originally Posted by Cleg
Didn't know the '12  RT had factory floorboards...  to hear about them. Where can I find some? the '13s won't mount on... Thanks
I don't think factory boards became available until the 2013 RT. I think that's a mistake on the RIVCO site. Thanks for the "heads up". I've corrected that in the OP.
-
Very Active Member

I have these...
Originally Posted by robmorg
PROS and CONS:
First the "PRO's"
- VERY well made with sturdy, rugged, and attractive components.
- They come in both powder-coated black and chrome to suite your taste.
- Can use with a variety of highway pegs.
- Easy and quick installation - no measurements necessary.
- With these brackets in place, you can still remove the maintenance access panels located beside them.
- The brackets place your highway pegs in a comfortable position close to the sides of the Spyder. Your legs are not spread out any further than necessary.
Now the "CON's"
- I thought just a little more length on the extension brackets would be helpful, so as to allow you to stretch your legs out just a little more. (I have long legs.)
- If your Spyder spews a lot of heat out through the side vents (i.e. the 2013 RT), your ankles are directly in the path of the heat. (A good pair of riding boots may overcome this problem.)
- The right bracket will come to rest on the plastic splash guard, in the event that the break-away floor board drops in an emergency braking application. HOWEVER, this may NOT be the problem that it may appear to be at first glance. Remember that in an emergency stop, you will be stomping on the brake pedal - NOT the floor board itself. So while the break-away floor board would normally fall about three inches, the brake pedal will likely only need another 3/4 of an inch or so at the most. So, if you mount the bracket an inch above the plastic splash guard, there will be very little pressure exerted on the guard as the peg bracket falls on it. Therefore damage to the splash guard should be extremely minimal, if any at all.
With the floor board dropped to where the highway peg bracket rests on the top of the splash guard, note how much additional room there is available for brake pedal travel. (See the "CON's" section immediately above.) I am not personally concerned about this, because on my Spyder, while I can manually trip the break-away board by reaching underneath and tripping the lever that rests on the brake pedal arm, I CANNOT deploy the board by stomping on the brake pedal no matter how hard I stomp on it. (Perhaps if I were very low on brake fluid, or if there were air in the lines stomping on the pedal would deploy the break-away board.) Your experience in this area may vary, however, see the note under "CON's" above with respect to likely damage to the splash guard in the event of emergency braking.
COMFORT WHILE RIDING:
I did take a test ride with my new highway pegs after the installation was complete. I was surprised to note that the riding position with my legs extended to the pegs was not as comfortable as I expected it to be. But that is probably just me. I am not personally used to riding with highway pegs, so it may take me a bit of time to find them more comfortable. I won't be using these while "riding around town", but I do believe that I will welcome the opportunity to stretch my legs from time to time while on a long highway trip. For those who are used to riding with highway pegs, I suspect that these will be very comfortable, as the position of the brackets will bring your feet closer to the Spyder than some other peg brackets currently on the market. Also, your heel can lightly rest on the top of the splash guard without exerting undue pressure on it.
and it took me a little while to get used to them, only because I've never used highway pegs before. But now... I love them!
If you do a lot of highway riding, you really need a pair to make the ride more enjoyable. You won't be sorry.
Great review!
2020 Chalk, RT Limited, Dark and matching RT622 trailer and BRP hitch. BRP Drivers Backrest, Auxiliary Light, Garmin Zumo XT, GPS Support, RT Rear Panel and Travel Cover. Spyderpops LEDs on fenders, mirrors, saddlebags, top case and RT rear panel. Spyderpops Rock Guard. BajaRon Swaybar, Wolo Bad Boy horn, Freedom Windshield, Elka Shocks.

-
Very Active Member
Thanks, Copperman,
I believe you right on both counts... that I will like the feel of them more after I use them a while, and that they will be a welcome asset while out on the highway on longer trips.
-
Active Member

Thank you for your very thorough review. I was actually looking at these last night.
Dan

2014 Cognac RT-S SE6 "Rusty"
-
Thank You Very Much for Your Amazing Review
Thank you so much for putting such a detailed review about our highway pegs and mounting system. I will bring it to the owners attention about creating PEG extensions for this model. I also enjoyed the detailed pictures and links to see exactly how these are installed. Once again we appreciate you using our products and hope to hear more wonderful reviews from you in the future.
-
Very Active Member
Originally Posted by CARA @ RIVCO
Thank you so much for putting such a detailed review about our highway pegs and mounting system. I will bring it to the owners attention about creating PEG extensions for this model. I also enjoyed the detailed pictures and links to see exactly how these are installed. Once again we appreciate you using our products and hope to hear more wonderful reviews from you in the future.
Cara,
Thanks. Glad you enjoyed the review. I noticed that you just updated your web site, so I fixed the broken links in the original message.
Perhaps you could provide two different sizes of "C"-bar extensions for customers to choose from. Those riders with an inseam of 30" or more would probably appreciate a bar that is about 1.5 - 2" longer. I know I would. I would recommend keeping the same degree of curve throughout the length.
-
Rode up to Rivco this morning to buy and have these installed. Rob's review is spot on. It doesn't take long at all to adjust to the difference between these and highway pegs mounted on two-wheeled cruisers, and they still give you the ability to adjust your positioning while riding on open highway stretches. Thanks again, Rob, for your review.
Side note for anyone who might be planning to drop in at Rivco to buy and have these installed: call first and make an appointment, and make sure they have what you want in stock.
MEP
2019 F3 Limited
-
Originally Posted by robmorg
Cara,
Thanks. Glad you enjoyed the review. I noticed that you just updated your web site, so I fixed the broken links in the original message.
Perhaps you could provide two different sizes of "C"-bar extensions for customers to choose from. Those riders with an inseam of 30" or more would probably appreciate a bar that is about 1.5 - 2" longer. I know I would. I would recommend keeping the same degree of curve throughout the length.
The website is still under construction but as soon as I have it fully up and running I will send you all the information that I have
-
Very Active Member
Originally Posted by MEP
Rode up to Rivco this morning to buy and have these installed. Rob's review is spot on. It doesn't take long at all to adjust to the difference between these and highway pegs mounted on two-wheeled cruisers, and they still give you the ability to adjust your positioning while riding on open highway stretches. Thanks again, Rob, for your review.
You're welcome. I'm glad you are enjoying your new pegs. 
 Posting Permissions
- You may not post new threads
- You may not post replies
- You may not post attachments
- You may not edit your posts
-
Forum Rules
|


 Reply With Quote