I have a couple of questions for all of you who applied your own wraps:
How hard is a complete wrap kit to apply (watched video several times but these guys are pros)?
Have any of you had trouble with the kit tearing while applying?
Did you use any special tools? It looks like all you need are cotton gloves, a hair dryer and a squeegee.
We are in the actual design phase and trying to decide if we want to install the wrap ourselves or find someone local that has experience. Hate to pay someone for something that we can do.
Do you want to specify your location I might be able to hook you up with someone..I have a full wrap after watching him put it on I know I couldn't do it.
Jim
Tall flag mount, spyderpops skid plate & stainless steel screen mesh, airhawk adjustable cushion, raised white lettered tires.
Do you want to specify your location I might be able to hook you up with someone..I have a full wrap after watching him put it on I know I couldn't do it.
Jim
I have a couple of questions for all of you who applied your own wraps:
How hard is a complete wrap kit to apply (watched video several times but these guys are pros)?
Have any of you had trouble with the kit tearing while applying?
Did you use any special tools? It looks like all you need are cotton gloves, a hair dryer and a squeegee.
We are in the actual design phase and trying to decide if we want to install the wrap ourselves or find someone local that has experience. Hate to pay someone for something that we can do.
Putting on a wrap isn't as hard as it looks if you take your time and use a little TLC (tender loving care) I applied mine which was 64 pieces. It was my first attempt armed with only a video, a credit card with felt glued to the edge and a spray bottle of water with a couple of drops of dish washing soap. I must say, it took me about 17 hrs to finish but I was quite pleased with the result. I don't think I could tear this stuff even if I tried (TLC)
First of all you need to know what you are putting down. ASK!!!!! The most common and expensive is 3M IJ180Cv3-10 with an approved 3M laminate. There are others. Are you doing a full wrap or one of the cut up kits sold for spyders that do not go around corners or edges? You do not use a liquid, any liquid under an air release vinyl. With a quality vinyl and laminate you can shrink (back to original shape) any over stretched material with a heat gun. Quality tools are required for professional results. Heat is also required after the install to set the adhesive. Not the squeegee. (Digital Thermometer required) Don't forget the adhesive promoter around areas subject to failure. and yes quality material and installation can be cleanly removed years after installation. Still want to do it yourself? It takes months and several failed attempts to train a installer. JMHO
Putting on a wrap isn't as hard as it looks if you take your time and use a little TLC (tender loving care) I applied mine which was 64 pieces. It was my first attempt armed with only a video, a credit card with felt glued to the edge and a spray bottle of water with a couple of drops of dish washing soap. I must say, it took me about 17 hrs to finish but I was quite pleased with the result. I don't think I could tear this stuff even if I tried (TLC)
Thank you for the encouraging comments Olddood. I would love to hear from some others who applied their own wrap also.
Just be patient and you'll be fine. Like OldDood said, it took him upwards of a full day to complete his project. If you remove all the panels, the application becomes more "familiar". Start with the smaller pieces to become accustomed to manipulating/stretching them. Don't be afraid to pull a piece off during installation and reapply. You'll notice bubbles and whatnot... Don't be worried about those, as that's what you tend to with the Hair Dryer. I was able to tend to all the bubbles this way. I just tapped my finger down on the bubble lightly once heated up with a hair dryer and they'd go away. Good to go. (Sorry about the terribly structured paragraph. I am unable to use the "Enter" key via I.E in this version of vBulletin.) Derek
First of all you need to know what you are putting down. ASK!!!!! The most common and expensive is 3M IJ180Cv3-10 with an approved 3M laminate. There are others. Are you doing a full wrap or one of the cut up kits sold for spyders that do not go around corners or edges? You do not use a liquid, any liquid under an air release vinyl. With a quality vinyl and laminate you can shrink (back to original shape) any over stretched material with a heat gun. Quality tools are required for professional results. Heat is also required after the install to set the adhesive. Not the squeegee. (Digital Thermometer required) Don't forget the adhesive promoter around areas subject to failure. and yes quality material and installation can be cleanly removed years after installation. Still want to do it yourself? It takes months and several failed attempts to train a installer. JMHO
Thank you for your comments also Frank G. Some very good points to consider. Since we are spending good money on the wrap, we want to make sure that it is done right.
Just be patient and you'll be fine. Like OldDood said, it took him upwards of a full day to complete his project. If you remove all the panels, the application becomes more "familiar". Start with the smaller pieces to become accustomed to manipulating/stretching them. Don't be afraid to pull a piece off during installation and reapply. You'll notice bubbles and whatnot... Don't be worried about those, as that's what you tend to with the Hair Dryer. I was able to tend to all the bubbles this way. I just tapped my finger down on the bubble lightly once heated up with a hair dryer and they'd go away. Good to go. (Sorry about the terribly structured paragraph. I am unable to use the "Enter" key via I.E in this version of vBulletin.) Derek
Thank you for your comments and who cares about the paragraph structure . I had the same issues with IE and then switched to Google Chrome. That eliminated the problem.
i did mine but i did not get ever part of the pipe but enough to make some difference,and the stuff i used was too thick to tear,i used a stapler to hold it while i put on the hose clamps on.
http://www.signsbannerswraps-houston.com/ these are the guys that installed my wrap on my RS....I purchased the wrap from Spiralus Spyder Wraps out of Calgary....the install was $150........really did a good job...after 50,000 miles with the wrap on I never had it lift or anything......
http://www.signsbannerswraps-houston.com/ these are the guys that installed my wrap on my RS....I purchased the wrap from Spiralus Spyder Wraps out of Calgary....the install was $150........really did a good job...after 50,000 miles with the wrap on I never had it lift or anything......
Thank you Flamingobabe. I am leaning towards a professional installer right now. I am working with Spiralus on our design .
i did mine but i did not get ever part of the pipe but enough to make some difference,and the stuff i used was too thick to tear,i used a stapler to hold it while i put on the hose clamps on.
I made the same mistake in assuming this thread was about wrapping the exhaust pipe. The penny dropped reading some of the helpful suggestions. Doh!
2011 RT-S SE5, Acumen Tempest Cat-1 Alarm, SmoothSpyder Belt Tensioner,
Autocom Super Pro Auto, Garmin Zumo 550 BT, 10amp Socket, Front Fender LED's,
Grip Puppies, Spyderpop Belt Guard, Nautilus Horn, Shortee Antenna, BajaRon's Swaybar,
Cree LED Day Running Lights.
Well... I suppose that you COULD wrap this around your exhaust system .
But I doubt that the results would be appreciated by anybody!
I would find a rattler-skin wrap around my zorst amusing.
By the way, I couldn't help noticing that in your self-portrait avatar your hairline is migrating north and your eyebrows appear to be moving up to fill the gap. Kinda in keeping with Darwin's evolution theory, you represent an improved version of the human male, one for whom baldness is no longer a concern. I feel fortunate to be alive to see it, Bob.
2011 RT-S SE5, Acumen Tempest Cat-1 Alarm, SmoothSpyder Belt Tensioner,
Autocom Super Pro Auto, Garmin Zumo 550 BT, 10amp Socket, Front Fender LED's,
Grip Puppies, Spyderpop Belt Guard, Nautilus Horn, Shortee Antenna, BajaRon's Swaybar,
Cree LED Day Running Lights.
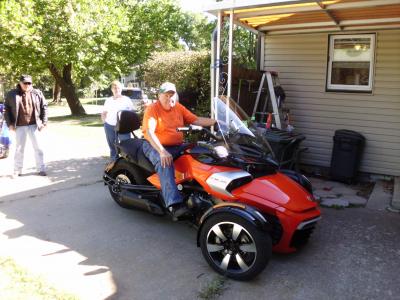
I would gladly pay someone $150.00 for a professional job. Mine took 16 hours on my first bike (in my avatar). I haven't found anything that would look right with my burnt orange RSS yet, so it is plain so far unless I decide to repaint it.
My 2011 RSS SM5 Mods all self installed: Spyder Detailing Graphics, Madstad, Kewlmetal risers, Rivco Driver Floorboards, Evoluzione Sway Bar, 25" Touring Windshield, 2010 RT Shocks, Hindle Exhaust, Isci Handbrake, Kurakyn Grips , Rivco Passenger Floorboards, Tricled fender tips and fender lights. Rivco license plate flag holder. BRP backrest. ESI tail light lens.
By the way, I couldn't help noticing that in your self-portrait avatar your hairline is migrating north and your eyebrows appear to be moving up to fill the gap. Kinda in keeping with Darwin's evolution theory, you represent an improved version of the human male, one for whom baldness is no longer a concern. I feel fortunate to be alive to see it, Bob.


 Reply With Quote


 .
.


