|
-
SpyderLovers Sponsor

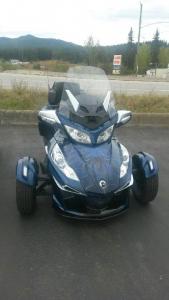
 Sticking saddlebag Sticking saddlebag
Had one that just refused to work properly. Did the hip check trick, the slap and tickle, jiggle. Finally got it open. Lubed the catch. Adjusted it to hit properly. Still sticky. Went thru that a few times to find the sweet spot. Nope! Finally took all the Tupperware off the back, turned the cable adjuster one turn, and BOOM! Works perfectly!! If your bag lids stick, try that!!
Joe Meyer

Dealer for the Outlaw/ROLO laser Alignment system
-
Very Active Member

-
Very Active Member

-
Very Active Member

I have the bike out of storage, and the saddle bags are sticking, but I can still get them open. Any chance someone has a pic of what the adjuster looks like? I have no issues taking the tupperware off, just not sure what to do after that.
Thanks
Ray
2017 RT-S
Bump Skid - Spyderpops
Wrap - Wrapmyspyder
swaybar - Bajaron
Sena 20D & SM10
3 PC Mesh Zippered Lid Net Set - TricLED
A arm LED's - Safety LED's - TricLED
Mirror Sequential turn signals
Glo-riders
LED rear turn signals and reverse lights
Front Grills
Third Brake light
Larson Scanner
Light Up - Sue Hopper
-
 Originally Posted by cptjam

Had one that just refused to work properly. Did the hip check trick, the slap and tickle, jiggle. Finally got it open. Lubed the catch. Adjusted it to hit properly. Still sticky. Went thru that a few times to find the sweet spot. Nope! Finally took all the Tupperware off the back, turned the cable adjuster one turn, and BOOM! Works perfectly!! If your bag lids stick, try that!!
Very timely advice. Thanks Joe
2014 RTL Platinum

-
Active Member

Another trick
About twice a season, or more if I'm in the mood, I clean my latches with
an old toothbrush and some solvent. Then finish up with a little squirt
of WD40. Those latches get pretty gummed up and will stick.
Chuck
Originally Posted by cptjam
Had one that just refused to work properly. Did the hip check trick, the slap and tickle, jiggle. Finally got it open. Lubed the catch. Adjusted it to hit properly. Still sticky. Went thru that a few times to find the sweet spot. Nope! Finally took all the Tupperware off the back, turned the cable adjuster one turn, and BOOM! Works perfectly!! If your bag lids stick, try that!!
-
Very Active Member
My right side bag is getting really bad. I am not sure where the cable adjustment is. any help would be really appreciated.
Ray
2017 RT-S
Bump Skid - Spyderpops
Wrap - Wrapmyspyder
swaybar - Bajaron
Sena 20D & SM10
3 PC Mesh Zippered Lid Net Set - TricLED
A arm LED's - Safety LED's - TricLED
Mirror Sequential turn signals
Glo-riders
LED rear turn signals and reverse lights
Front Grills
Third Brake light
Larson Scanner
Light Up - Sue Hopper
-
SpyderLovers Sponsor
😢
We dont have an RT anymore, but the next one I work on Ill get a picture.
Joe Meyer
Dealer for the Outlaw/ROLO laser Alignment system
-
Very Active Member
Originally Posted by cptjam
We dont have an RT anymore, but the next one I work on Ill get a picture.
Thanks Joe
2017 RT-S
Bump Skid - Spyderpops
Wrap - Wrapmyspyder
swaybar - Bajaron
Sena 20D & SM10
3 PC Mesh Zippered Lid Net Set - TricLED
A arm LED's - Safety LED's - TricLED
Mirror Sequential turn signals
Glo-riders
LED rear turn signals and reverse lights
Front Grills
Third Brake light
Larson Scanner
Light Up - Sue Hopper
-
Had a sticky Lt. bag. Pulled the trunk panel, turned the adjuster one full turn, and whaala, works as should. I think after a few pulls on the paddles when new, the cables have some initial stretch in them and they require the slack to be taken up. Mac
-
Very Active Member
Originally Posted by Mad Mac
Had a sticky Lt. bag. Pulled the trunk panel, turned the adjuster one full turn, and whaala, works as should. I think after a few pulls on the paddles when new, the cables have some initial stretch in them and they require the slack to be taken up. Mac
What I'm trying to find out is what that adjuster looks like, and exactly where it is. I had the back panel off this past weekend, but didn't see anything that looks like an adjuster. If it's behind the latch, I am not sure how to get in there.
Thanks
Ray
2017 RT-S
Bump Skid - Spyderpops
Wrap - Wrapmyspyder
swaybar - Bajaron
Sena 20D & SM10
3 PC Mesh Zippered Lid Net Set - TricLED
A arm LED's - Safety LED's - TricLED
Mirror Sequential turn signals
Glo-riders
LED rear turn signals and reverse lights
Front Grills
Third Brake light
Larson Scanner
Light Up - Sue Hopper
-
Originally Posted by bcer960
What I'm trying to find out is what that adjuster looks like, and exactly where it is. I had the back panel off this past weekend, but didn't see anything that looks like an adjuster. If it's behind the latch, I am not sure how to get in there.
Thanks
Ray
You are in the right spot. Follow the cables from the paddle, down about 12 to14 inches(behind the tail lights) and you will find a barrel with a nut on it(might be zip-tied to the plastic molding). Loosen the nut and turn the barrel counter clockwise a small amount, then try to open the bag. Do this until you have most of the slack taken up. Leave about 1/8" of slack, just before the paddle starts to have resistance and starts to release the latch/bag. This should get the desired effect for you. Good luck! Mac
-
Very Active Member
Originally Posted by Mad Mac
You are in the right spot. Follow the cables from the paddle, down about 12 to14 inches(behind the tail lights) and you will find a barrel with a nut on it(might be zip-tied to the plastic molding). Loosen the nut and turn the barrel counter clockwise a small amount, then try to open the bag. Do this until you have most of the slack taken up. Leave about 1/8" of slack, just before the paddle starts to have resistance and starts to release the latch/bag. This should get the desired effect for you. Good luck! Mac
Thanks so much Mac. I will be doing this tonight when I get home from work.
Ray
2017 RT-S
Bump Skid - Spyderpops
Wrap - Wrapmyspyder
swaybar - Bajaron
Sena 20D & SM10
3 PC Mesh Zippered Lid Net Set - TricLED
A arm LED's - Safety LED's - TricLED
Mirror Sequential turn signals
Glo-riders
LED rear turn signals and reverse lights
Front Grills
Third Brake light
Larson Scanner
Light Up - Sue Hopper
-
Very Active Member
Thanks again Mac, the whole process took less than 10 mins, once I knew what and where i was looking for.
Ray
2017 RT-S
Bump Skid - Spyderpops
Wrap - Wrapmyspyder
swaybar - Bajaron
Sena 20D & SM10
3 PC Mesh Zippered Lid Net Set - TricLED
A arm LED's - Safety LED's - TricLED
Mirror Sequential turn signals
Glo-riders
LED rear turn signals and reverse lights
Front Grills
Third Brake light
Larson Scanner
Light Up - Sue Hopper
-
Originally Posted by bcer960
Thanks again Mac, the whole process took less than 10 mins, once I knew what and where i was looking for.
Ray
You are very welcome Ray. Takes longer to remove the panel, than to adjust the cable(s). Glad it worked out. Mac
-
SpyderLovers Sponsor
Tomorrow
Got an RT coming tomorrow. Ill get pix. Joe
Joe Meyer
Dealer for the Outlaw/ROLO laser Alignment system
-
Originally Posted by cptjam
Got an RT coming tomorrow. Ill get pix. Joe
That would be great, Joe.
2014 RTL Platinum
-
Very Active Member
Originally Posted by cptjam
Got an RT coming tomorrow. Ill get pix. Joe
Although I figured it out, having a pic to help future people will be helpful.
Ray
2017 RT-S
Bump Skid - Spyderpops
Wrap - Wrapmyspyder
swaybar - Bajaron
Sena 20D & SM10
3 PC Mesh Zippered Lid Net Set - TricLED
A arm LED's - Safety LED's - TricLED
Mirror Sequential turn signals
Glo-riders
LED rear turn signals and reverse lights
Front Grills
Third Brake light
Larson Scanner
Light Up - Sue Hopper
-
Originally Posted by bcer960
Although I figured it out, having a pic to help future people will be helpful. Ray
Do you have any pictures or explanations of how to access the adjusters, now that you've got it figured out?
2014 RTL Platinum
-
Very Active Member
Originally Posted by UtahPete
Do you have any pictures or explanations of how to access the adjusters, now that you've got it figured out?
Take off the colored back plastic, as others on this thread have stated. 8 screws, 4 in the top of the plastic at the truck, 2 on each side in the saddlebag. (the rear 2)
Next remove the three small screws under the handles for the trunk and saddlebags. This lowers the black plastic under the turn signals.
The adjusters were right below my turn signal assemblies. Very easy to get at. The look like a black plastic tube, about 1.25" long, with a cable going through them.
Un-tighten the lock nut ( I did this easily by hand ) and turn the barrel of the adjuster clockwise. I did one full turn to start and checked if the bags would open. On my bike, both needed more to work properly, but every bike will be different.
Tighten up the lock nut, and replace the lower black Tupperware with the three screws, and the colored plastic with all 8 of it's screws and you are done.
Hope this helps others.
Ray
2017 RT-S
Bump Skid - Spyderpops
Wrap - Wrapmyspyder
swaybar - Bajaron
Sena 20D & SM10
3 PC Mesh Zippered Lid Net Set - TricLED
A arm LED's - Safety LED's - TricLED
Mirror Sequential turn signals
Glo-riders
LED rear turn signals and reverse lights
Front Grills
Third Brake light
Larson Scanner
Light Up - Sue Hopper
-
Originally Posted by bcer960
Take off the colored back plastic, as others on this thread have stated. 8 screws, 4 in the top of the plastic at the truck, 2 on each side in the saddlebag. (the rear 2)
Next remove the three small screws under the handles for the trunk and saddlebags. This lowers the black plastic under the turn signals.
The adjusters were right below my turn signal assemblies. Very easy to get at. The look like a black plastic tube, about 1.25" long, with a cable going through them.
Un-tighten the lock nut ( I did this easily by hand ) and turn the barrel of the adjuster clockwise. I did one full turn to start and checked if the bags would open. On my bike, both needed more to work properly, but every bike will be different.
Tighten up the lock nut, and replace the lower black Tupperware with the three screws, and the colored plastic with all 8 of it's screws and you are done.
Hope this helps others. Ray
It does, thanks. I thought there was more involved than that. I've had those panels off before for various reasons and didn't realize that gave me the access to the adjusters that I needed.
Thanks again.
2014 RTL Platinum
-
Very Active Member
Originally Posted by UtahPete
It does, thanks. I thought there was more involved than that. I've had those panels off before for various reasons and didn't realize that gave me the access to the adjusters that I needed.
Thanks again.
I totally understand that. I didn't know what I was looking for until Mac got me to the correct place.
2017 RT-S
Bump Skid - Spyderpops
Wrap - Wrapmyspyder
swaybar - Bajaron
Sena 20D & SM10
3 PC Mesh Zippered Lid Net Set - TricLED
A arm LED's - Safety LED's - TricLED
Mirror Sequential turn signals
Glo-riders
LED rear turn signals and reverse lights
Front Grills
Third Brake light
Larson Scanner
Light Up - Sue Hopper
-
Very Active Member

I attached pictures to a post I wrote up back in 2012 or 2013. The adjusters are a lot like brake adjusters on bikes. Bruce
New to Sue and I
2021, LTD, Asphalt Gray, 22,000 miles
Gone but not forgotten
RTS 2011 SM5, 95,000 miles
-
SpyderLovers Sponsor
AWOL
My guy had to reschedule, so, no pix. Just as soon as I get one in, I am on it. If I had a nickel for every time I saw a spyder owner hip check a saddlebag, I would have a lot of nickels! If you happen to see us at a rally, and need this done, I will do it for you! Joe
Joe Meyer
Dealer for the Outlaw/ROLO laser Alignment system
-
Very Active Member
Originally Posted by cptjam
My guy had to reschedule, so, no pix. Just as soon as I get one in, I am on it. If I had a nickel for every time I saw a spyder owner hip check a saddlebag, I would have a lot of nickels! If you happen to see us at a rally, and need this done, I will do it for you! Joe
Thanks anyway Joe,
I'll take it apart again and take pics of the procedure.
Ray
2017 RT-S
Bump Skid - Spyderpops
Wrap - Wrapmyspyder
swaybar - Bajaron
Sena 20D & SM10
3 PC Mesh Zippered Lid Net Set - TricLED
A arm LED's - Safety LED's - TricLED
Mirror Sequential turn signals
Glo-riders
LED rear turn signals and reverse lights
Front Grills
Third Brake light
Larson Scanner
Light Up - Sue Hopper
 Posting Permissions
- You may not post new threads
- You may not post replies
- You may not post attachments
- You may not edit your posts
-
Forum Rules
|


 Reply With Quote


 after all Joe Public and Joe Meyer do find these cures for us...
