|
-
 best place to mount auxiliary lights best place to mount auxiliary lights
I'm thinking of adding LED lights on my RT and I'm leaning towards the rigid LED lights particularly their D2's since they are plug and play. Does anyone have this kind of upgrade? Where did you mount your aux LED lights? Any info will be much appreciated. Thanks.
-
 RT Aux. Lights RT Aux. Lights
Trying to mount mine low using fender bolts with a bracket that will position them inside the front tires and use the fender tip lights for power. LEDS so there shouldn't be much of a draw. I think keeping them low will work best for what I want them for. Good Luck!
-

I went with the Clearwater LED lights. A bit pricy but have been happy with them so far.
-
 RT Aux Lights RT Aux Lights
I recently mounted two 18 watt aux light bars (2 rows of 3 LEDs on each light) on my black 2014 RT-S. I found the light bars on Amazon for less than $20 as a pair and they are finned black aluminum, adjustable and quite bright. Now for mounting: If you look under the center of the top A-arm on each side you will find a pre-drilled hole on a flat piece of metal welded horizontally to the forward tube. This hole is at the body side of the electrical connector (centered on the A-arm) that feeds power to the forward running lights. Since the plastic cover of the A-arm is 3/4" above the pre-drilled horizontal plate, simply insert a 3/4" spacer (any material) between the plastic cover and the metal plate with the pre-drilled hole. I made my own spacers but you can buy them at any well-stocked hardware store that carries them. Where I live Ace/True Value carries them in chrome and black chrome in 1/8" increments. I mounted the brackets using 1 1/2" stainless cap screws with strips of 3M two face mounting tape between the brackets and the plastic A-arm covers. To determine where to drill the plastic A-arm cover, I heated the tip of a small awl and pushed it up thru the pre-drilled hole until it penetrated the plastic cover, then drilled the right sized hole from the top. Because these lights are quite bright I angled each 10 degrees down from horizontal and the left one as you sit the Spyder turned 5 degrees toward the curb side. I Did not want to blind oncoming drivers. These angles work nicely. This set up makes for a rigid, centered between wheel and body mount that does not turn with the wheel. I wired it to my fog light circuit but you choose what to electrically tie into. I also did a hyper flash for the new voltage values on the fog light circuit. The finished product gave me two LED headlights + two LED fog lights and two 18W aux LED lights when all are turned on--all bright and white. Hope this gives you some ideas
-
Very Active Member


Pictures, Show us pictures!
Safe Rides,
David and Sharon Goebel
Both Retired USAF Veterans
2018 Anniversary Edition RT Limited
Baja Ron ultimate swaybar. Vredestein tires, Baja Ron Front Shock Pre-load adjusters, Pedal Box, See my Spyder Garage
IBA 70020 |
 |
-
Very Active Member


Don Great post,thank you for the ideas. Can you take pictures and post them?

Happy TRAils/NSD
Paul
2012 RT L
AMA 25 years Life Member
TRA
PGR
Rhino Riders Plate #83
Venturers #78
TOI

-
 RT Aux Lights Reply to request for pix RT Aux Lights Reply to request for pix
Aux light.jpgCap screw location.jpglights on.jpgFirst Picture shows a mounted light to the top cover of the left A-arm with the mounting nut attached to the 1/4 20 (1 & 1/2" long) cap screw. Second picture shows the underside of the top A-arm with the head of the cap screw going through the pre-drilled hole in the horizontal bracket welded to the front tube of the upper A-arm--the cap screw head is right next to the red power lead to the fender running light. Picture 3 is all lights on. I installed a toggle between the fog light power and the aux lights so I could turn them on or off as long as the fog lights were turned on. Could not get a good picture of the 3/4" bushing as it is hidden between the plastic cover and the welded horizontal plate. I made my bushing from 1" diameter brass stock, 3/4" long and center drilled 5/16" hole. Hope this visual helps. This is only my second post so I'm still feeling my way around the site. Safe rides, Don T.
-

Thanks for sharing some pics, Don! Your setup looks nice.
-
Active Member


Thank you, very nice. Can you please explain this/. :I also did a hyper flash for the new voltage values on the fog light circuit
2015 RTS
Replaced Catalytic Converter with Lamonster Pipe
Rivco Flag Holders
Tricled wideview mirrors
Garage door opener
Zumo GPS
Ultimate seat
F4 windshield with vent
Doc's belt damper
Value Accessories RAM mount
Baja Ron sway bar and Links

-

 Originally Posted by Don T.

I recently mounted two 18 watt aux light bars (2 rows of 3 LEDs on each light) on my black 2014 RT-S. I found the light bars on Amazon for less than $20 as a pair and they are finned black aluminum, adjustable and quite bright. I wired it to my fog light circuit but you choose what to electrically tie into. I also did a hyper flash for the new voltage values on the fog light circuit. The finished product gave me two LED headlights + two LED fog lights and two 18W aux LED lights when all are turned on--all bright and white. Hope this gives you some ideas
Looking around this forum for references to hyper flash, it seems that's a problem with turn signals; why would you have a problem with these lights wired to your fog light circuit? Anyone got any advice on this? Also, I don't see any reference to the more expensive lights (e.g. TricLED driving lights at $300 a pair) causing a problem with the circuitry. What am I missing?
I would like to add some brighter lights lower down for visibility (not light projection onto the road) because the fog lights just don't cut it for me (can't see them in daylight) and don't want to buy pricey driving lights.
2014 RTL Platinum

-
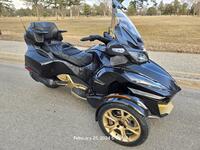
 Two beautiful machines Two beautiful machines
 Originally Posted by UtahPete

Looking around this forum for references to hyper flash, it seems that's a problem with turn signals; why would you have a problem with these lights wired to your fog light circuit? Anyone got any advice on this? Also, I don't see any reference to the more expensive lights (e.g. TricLED driving lights at $300 a pair) causing a problem with the circuitry. What am I missing?
I would like to add some brighter lights lower down for visibility (not light projection onto the road) because the fog lights just don't cut it for me (can't see them in daylight) and don't want to buy pricey driving lights.
I have a 2010 RT with the factory fog lights. They really didn't do much with the halogen bulbs. I installed the Xenon Depot Xenon upgrade with the Phillips bulbs. The result is absolutely amazing. It fills in the dark place between your Can Am and where your headlights hit the road. I go on night rides just to look at how amazing they are. If you are comfortable with working on your Can Am, it is not a big deal. You do have to remove the "frunk" to install the ballasts required. This is for your consideration.
-
Active Member


I mounted my LED lights on a RT using the lower shock Bolt.
-

 Originally Posted by Ben Burped

I have a 2010 RT with the factory fog lights. They really didn't do much with the halogen bulbs. I installed the Xenon Depot Xenon upgrade with the Phillips bulbs. The result is absolutely amazing. It fills in the dark place between your Can Am and where your headlights hit the road. I go on night rides just to look at how amazing they are. If you are comfortable with working on your Can Am, it is not a big deal. You do have to remove the "frunk" to install the ballasts required. This is for your consideration.
With all the attention on LED kits, I'd overlooked the HID option. Thanks, I'll check it out.
2014 RTL Platinum

-

 Originally Posted by Ben Burped

I have a 2010 RT with the factory fog lights. They really didn't do much with the halogen bulbs. I installed the Xenon Depot Xenon upgrade with the Phillips bulbs. The result is absolutely amazing. It fills in the dark place between your Can Am and where your headlights hit the road. I go on night rides just to look at how amazing they are. If you are comfortable with working on your Can Am, it is not a big deal. You do have to remove the "frunk" to install the ballasts required. This is for your consideration.
Do you have a link to the kit you used? Do they throw enough light down the road to work as driving lights, or do they only fill in the dark spot in front of the Spyder?
2014 RTL Platinum

-
 They're amazing They're amazing
 Originally Posted by UtahPete

Do you have a link to the kit you used? Do they throw enough light down the road to work as driving lights, or do they only fill in the dark spot in front of the Spyder?
Yes, they throw a clean, white, powerful light without blinding oncoming drivers. It is wide enough to light up from line to line and will light up the whole area up to where the headlights start. Look up Xenon Depot and click on motorcycles, Can Am, and your year and model. I went with the 4100K color with the Phillips bulb upgrade for maximum lumens available. Hope this helps. Finally, I did not use the relays and have had no trouble from the lights. Xenon Depot sells a very high grade product that produces clean, reliable, and predictable light.
 Posting Permissions
- You may not post new threads
- You may not post replies
- You may not post attachments
- You may not edit your posts
-
Forum Rules
|


 Reply With Quote


 https://m.flickr.com/photos/raysoftheson/
